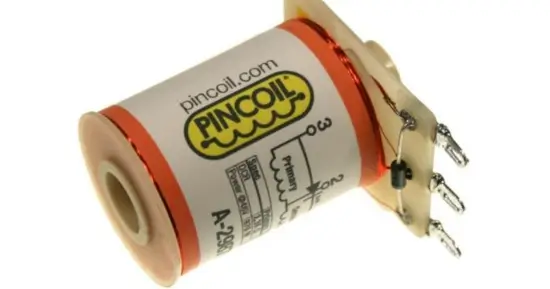
Learn how to test a pinball coil with a multimeter. As it is clear from its name, a pinball coil consists of a roll of magnetic wire that is rolled around a plastic spool or any other component. It is already known that coils are considered an integral part of the solenoid. These coils help to produce the magnetic field when current is given to them. Like many other appliances, many of these solenoids are also in the pinball machines.
They are available in different sizes depending on the machine or appliance in which they will be used. But they are mostly present in the pinball games.
Table of Contents
ToggleHow do pinball coils work?
Before diving into the testing procedure, everyone should know about the exact process in which these pinball coils work so that you can better understand the importance of these coils and what types of further troubles they can cause for you if left unchecked. A diode is always connected to the terminals and pinball coil in these electronic games. They are considered as the pressure relief valve for the coil. They direct the electric current in one condition as well.
When we turn off the electricity supply, the coil will be turned off, but the residential magnetic field of the coil will cause trouble here. It will produce a back electromotive force. This big amount of back EMF will increase the voltage value to a great extent, which will cause an increase in the inertia of the magnetic field in return. And ultimately, the transistor will malfunction.
To stop all this trouble, the pinball coil, which has a diode, will successfully help that back electromotive force break in several pieces of heat. In this way, back EMF, instead of increasing the voltage and back pressure on the machine, will get lost by the system in the form of heat energy. But when we say that the pinball coil has a failure in it, it means all this work will not happen in the right way.
Reasons for the pinball coils failure:
After being assured about the whole procedure in which the pinball coils work, it is time to know the reasons for the failure of the pinball coils. It is important to give attention to this point, too, because we need to know the reasons behind the failure of the pinball coil to be able to save our pinball coil in the future. Or you may learn that there are some practices you must stop regarding the pinball coils.
Lubrication of the coil:
People often think that to increase the pinball coil’s life, they have to lubricate it with some machine oil. There is a big no for this. There is no doubt that machines might need lubrication, but what about those machines that already have their lubricants in their system.
These coils contain nylon sleeves, which act as a natural lubricant for them. So don’t use spray lubricants, too, because they can catch fire.
Proper cleaning:
Coils also malfunction when we ignore their proper cleaning, so clean them properly with a suitable cloth. Don’t use the wet cloth for this purpose.
Faulty switches:
Ensure that those powering the pinball coils are working well so that they cannot damage the condition of the pinball coil and provide the appropriate amount of electric current to them at a proper time.
The direction of diode:
Diodes are considered the most important part of the pinball coil, so they should be installed in the right direction. Some people need to learn about the right direction of the diodes, so they are advised to look at the manual system guide of the machine first before installing any diode in the machine. The diode installed in the wrong direction can cause severe damage to the pinball coil.
Power switching switch of the pinball coil:
Like diodes, the pinball coil has another important component that helps it to function properly when the electric energy exceeds its limit; the power saving mode is on by a switch called the end stroke switch of the pinball coil.
This switch helps the coil not get overheated when a lot of voltage is present. If this switch fails, It is a sign that you have to change your pinball coil as well because, without it, your pinball coil is at a great risk of damage.
How to test a pinball coil with a multimeter?
Digital Multimeters are well-known electrical tools that help solve almost any electrical problem. That is why they are called an all-in-one tool, even for the electricians. Pinball coils should be called one-stop because it will only be possible for you to test your pinball coil quite efficiently with the help of a digital multimeter.
Materials required:
This is a very convenient testing procedure as you only need a little electrical tool. You need to manage the following things before starting the testing procedure.
- Digital Multimeter
- Protection gloves
- Protection glasses
Preventive measures:
Self-care is very important in any case. While testing any electrical appliance, your most important duty is to care for yourself and your family members. Perform this test at a place away from the children’s reach. Remember to wear protective gloves and glasses before starting the procedure.
How to test a pinball coil with a multimeter (step-by-step guide)
Set the digital multimeter:
The first step of this testing procedure is to set the digital multimeter according to the requirements of the test. Here you have to put your digital multimeter in the resistance settings by turning the selection knob of the digital multimeter.
Insert the leads:
The second step is calculating the resistance amount around your pinball coil. So, for this, you have to insert the leads of the digital multimeter one by one across the different sides of the coil.
Check the results:
Check the results of the resistance values of all the coils present in the machine. The resistance value of the ping ball cause should be around 2 to 3 ohms. If the value is more than this confined value, then it means that all the pinball coils are working well, but if the resistance value is less than 2, then it means that the coil is faulty. One or two pinball coils of the machine are troubling in the results. In this case, you have to replace only the faulted ones.
The other possible reason behind the faulty pinball coils is the diode or the other components of the pinball coil. Suppose you have a piece of proper knowledge about the working of the pinball coil, as explained above. In that case, you can manually check any other fault, like the pinball coils’ broken parts, without any electrical tool’s help.
Final Verdict:
Testing or checking your electrical tools is the only way to keep your appliances in good condition; otherwise, minor neglect can lead to a big disaster. If you are fond of pinball games and have a pinball game machine at your home.
You want to keep it up to date and save it from getting faulty, then you have to check its fine frequently by following the testing procedure explained here. This can help you save time and money and provide you with enough knowledge about the working and testing of the pinball coils.


