An electric motor needs a battery to run. It is as necessary as the heart for the human body. If the battery is not working normally, the motor will also not work. If you have a boat whose battery is not working as before, you should test it as soon as possible, and you can test a boat battery with a multimeter.
We have so many different types of batteries depending upon the automobile in which it is present, so all kinds of batteries have different ways of testing. You cannot test them by using the same procedure. That’s why we will guide you on how to test a boat battery with a multimeter.
First of all, we would like to tell you that if you have already tested some car batteries and other automobile batteries and think that this is going to act the same, then you are not correct this time because the boat batteries are something different and their testing procedure is also different.
So, in this case, you must be precise and follow every guideline and instruction properly.
Types of boat batteries
The battery system will also vary because there are different types of boats depending on the size. In boats, the battery is the main source that supplies the electric current to the boat.
It runs on the DC voltage, and the value of the DC voltage varies according to the different sizes of batteries. It may be a 6 volts battery, 12 volts, or 24 volts.
Here we are giving some basic types of boat batteries used nowadays.
- AGM battery which is also called absorbed glass, met
- Wet cell battery
- Gel cell battery
The batteries in the boats are connected to two wires: the one which supplies the current from the battery to the main instrument and the other one that takes that current back to the boat battery to complete the circuit in the DC system.
Despite different types of boat batteries and their different level of power supply, the reasons for them getting damaged may be the same.
So first, we will talk about the signs and symptoms by which you will get to know that your boat battery has got damaged, and then we will move towards the testing procedure of these boat batteries by using the multimeter.
Signs and symptoms of a damaged boat battery
Here we are listing some symptoms of a damaged boat battery. Check these all and find if any of them can be seen in your automobile. If the answer is yes, then you are at the right place because we will tell you how you can get to the more precise test in the next step.
- If your boat’s engine is not getting started efficiently, it is a major sign that your boat battery has been damaged.
- Any physical damage like leakage, bulging broken cables, and cracks in the battery can also lead to severe damage. If you find any broken cables, replace them with new ones because they may help the boat battery work properly. At this stage, you don’t have to replace your battery.
- If your boat battery is getting too hot, then it is also a sign that it may get burned at some time.
- If the GPS of your boat is not working correctly, it means that there is some problem with the battery.
- If the bilge pump has malfunctioned, it is also a sign of a damaged boat battery.
If you have seen any of the symptoms mentioned above in your boat battery, the next step will be helpful for you. So read out the whole procedure and perform the test as explained below.
How to test boat battery with the multimeter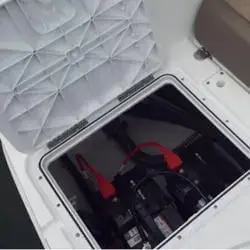
If you are going to handle any electrical equipment. In that case, it means that you need proper protection, so we will tell you how you get protected while performing this test protection is very necessary, so don’t neglect it at any cost.
- Wear protective goggles, which will protect your eyes from any spark
- Refrain from conducting the test in warm places.
- Remove the cover of the battery and leave it for at least one hour so that it may get set before the test.
- Don’t perform the test with wet hands.
Testing procedure:
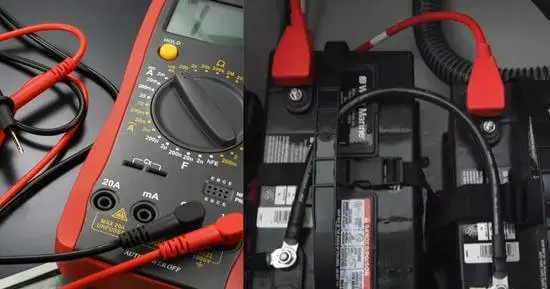
- Select the multimeter’s dial at the DC voltage option.
- Connect the black and red probes of the multimeter with the boat battery.
- Get the readings on the digital screen of the multimeter.
We will briefly explain how to test a boat battery with a multimeter so you can understand and get your test done precisely.
Set the multimeter:
If you have used the multimeter before, you will know that you have to set the multimeter according to the test you will conduct. We will also guide you if you have not used the multimeter before.
Here on the multimeter, you will see two dials. The bigger dial will have to be on the DC voltage option, so turn the dial towards the DC voltage. Now the smaller dial is to select a specific voltage, so select the voltage between 15 to 20 volts to test your boat battery.
Now we will move toward the next step of testing the boat battery with the multimeter.
Connect the probes:
The second step should be done with great accuracy; here, you have to open the battery box of your boat and then attach the multimeter’s probes to the terminals.
You have to connect the black probe to the COM terminal of the multimeter, and the red probe should be connected to the terminal of the multimeter, which is made for ohms, Volts, and diode testing.
Turn on the multimeter:
As you are using the multimeter to conduct this test, the multimeter should be put on. You must press the rotary dial’s middle button for 2 to 3 seconds. This will help your multimeter to become an automatic one.
Connect the battery with the multimeter:
Now you have to connect the black probe of the multimeter with the battery’s negative terminal, and the Red probe should be attached to the battery’s positive terminal.
Now you will hear a beep sound, which means that the multimeter is taking the readings.
Check the multimeter screen:
Now the screen will give you different results for different types of batteries. So here we are giving you the readings according to the different types of boat batteries.
- If you are testing a gel cell or the AGM battery, the resulting readings should fall between 12.8 and 12.9 volts.
- If you are testing a wet cell battery, your readings should be around 12.4 volts.
But if you are getting the result around 10.4 volts or below this, your battery has a short circuit, and it should be replaced immediately because it is no longer working.
Final verdict
So how to test a boat battery with a multimeter? The boat batteries are designed according to the requirement of the automobile. Still, sometimes, for many reasons explained above, they can also get damaged because they are all electrical equipment.
So if your boat battery is not running correctly and is not giving you the exact final results, it is time to test it using the above procedure.
But keep in mind that it is not necessary all the time to replace the battery because if there is any damage in the wire or any cuts in the outer surface of the battery, you can also repair the damage.
These boat batteries are not very cheap, so first, you have to select the boat battery according to the size of the area where it is going to be fitted, and then the second thing is that you have to buy the boat battery from an official place so that you will get an original battery but don’t worry things can get damaged so test them before the damage becomes big.
Related Guides:


