
While setting up a device in a room, it’s essential to know if the outlet is 120 or 240 volts. By testing the voltage, you can configure if the circuit supplies maximum current or if the wires are damaged and leaking current. In this post, you’ll learn how to check 240 Voltage with a multimeter and other tools.
To add an electrical connection, it should be checked whether the outlet supplies the voltage the device needs or not. Such as, if your device needs 240V and your electrical distribution is 120V, it will cause trouble.
Each connection has three wires in an outlet or a circuit: live, ground, and neutral. We’ll test the voltage of all the wires by taking ground or a neutral wire as a reference(it will always attach to the multimeter).
Let’s understand in detail.
How to Check 240 Voltage with a Multimeter
To check 240 voltage using a multimeter:
- Set your multimeter to AC voltage (V〜) at a higher range (600V).
- Connect the black probe to the ground and the red probe to the live wire.
- If your home power distribution is 240V, the multimeter will show around 240 volts.
- If your home supply is divided into 120 V, the multimeter will show around 120V.
- If the multimeter reads quite below the supply(120 or 240V), a wire is damaged, leaking the current.
Follow Step by Step to check 240 voltage with a multimeter:
Step 1: Safety Measures
Wear insulated gloves, as we have to test high-voltage wires.
Wear shoes and dry the whole area.
Step 2: Locate wires in the outlet(circuit).
First, understand the structure of wiring in an outlet or prong.
The ground wire is usually green and is installed at the top hole of a 3-prong receptacle. The Live wire is brown or black and is at the left terminal. The neutral wire is blue or white and is at the right terminal.
Step 3: Multimeter Setting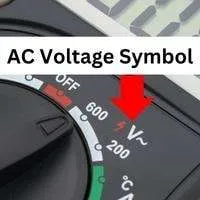
Insert the black probe in the COM port and the red probe in the VmAΩ port.
Set your multimeter to AC voltage(V〜) at a higher range, such as 600V.
Step 4: Connect probes and check multimeter readings
Now connect the black probe to the ground wire and the red probe to the live wire. The multimeter will display the voltage the live wire carries, which would be 120V or 240V.
If you don’t know which wire is live or ground, insert your multimeter’s probes in the three holes.
As neutral and ground wires don’t supply current, the multimeter will read 0 or very low voltage if connected. The third wire that is spare is the live wire.
Disconnect the red probe from the previous wire and attach it to the remaining wire. Suppose the multimeter displays a voltage such as 240V. Then your circuit or outlet has a single power phase (240). if the multimeter reads 120V, your electrical system is divided into two live phases, each carrying 120 volts.
Is voltage Leaking?
In live wire, the voltage reading can be a few volts above or below 120 or 240 volts, such as 242 or 238 volts, indicating that the voltage supply is 240 V.
If your multimeter reads 10% less voltage than the ideal range, such as a reading of 110V or less in a 120V power supply, the current leaks through a damaged wire.
What does negative Voltage reading mean?
If your multimeter reads negative voltage, live and ground wires are connected in opposite directions. Remove both probes(black & red) and reverse their connection order (live wire to red and ground or neutral to black).
Frequently Asked Question
-
How to tell if a circuit is 120 or 240?
Measure the circuit’s voltage by setting the multimeter to AC voltage. Connect the red probe to the live wire and the black probe to the ground or neutral. If the multimeter displays around 120 V, the circuit is 120V. However, if the multimeter reads around 240V, the circuit has a single 240V phase.
-
How to test an outlet without a multimeter?
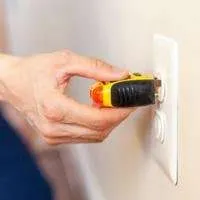
Other than a multimeter, you can use an outlet tester to test an outlet to see if the live ground and neutral are connected.
Insert the outlet tester in the socket and compare the tester’s lights with the signs given by the tester. Advanced outlet tester also displays the voltage of the outlet (circuit).
-
How to check voltage without a multimeter?
You can check if there is voltage in a circuit with a tester screwdriver, a non-contact voltage tester, or by connecting an appliance in the circuit. You can’t measure the exact voltage without a multimeter.
-
How to tell which wire is hot without a multimeter?

Put your thumb on the top of a tester screwdriver and insert it inside all socket terminals or attach it to wires. If the bulb in the tester glows, voltage is in the tested terminal or wire.
Pass a noncontact voltage tester through all wires to test voltage in wires. The tester will blink or beep continuously when it detects high voltage in a wire.
Conclusion
Testing the live wire voltage is necessary for the right power connection. If your appliance requires 240V but your power supply is 120V, you can test it with a multimeter to prevent risks to your costly equipment.
Must wear gloves before testing. Set your multimeter to AC voltage and check the voltage in wires by connecting different. Your multimeter will display either 120 or 240V when the live and ground wires are attached.
Hopefully, this basic guide will help you to test 240 volts in your outlet or any circuit’s using a multimeter. If you have a query, let’s ask in the comments.
Related Guides:


