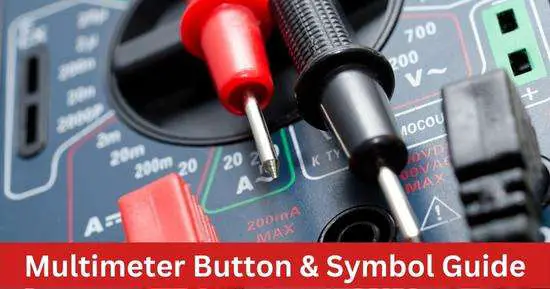
For accurate testing, beginners need to understand the multimeter’s functions, symbols, and buttons. A basic multimeter offers you seven-eight different functions with different ranges. In this post, you’ll learn multimeter symbols and a button guide on how beginners can use a multimeter.
In 1920, British Post Office engineer Donald Macadie invented the first multimeter. Previously, each electrical quantity was measured by a separate tool, such as a galvanometer(for current).
What Is A Multimeter?
A multimeter is an electrical measurement tool with several functions, such as AC and DC voltage, AC and DC current, Resistance, Continuity, Capacitance, Diode test, ETC.
A multimeter allows you to measure various electric quantities with just one tool, eliminating the need for a specific tool for measuring each. Multimeters come in analog, digital, and advanced professional multimeters.
In detail, we’ll explore several parts of a multimeter, such as probes, dials, symbols, and buttons.
Multimeter symbols and buttons guide
Most multimeters have 4-5 parts probes, ports(to insert probes), Knobs (dials to select functions and ranges), Buttons, and Display.
We can test 7-8 electrical quantities such as voltage, resistance, amperage, capacitance, and more. Each function on the multimeter is represented by a sign (SI unit) that you’ll have to remember for the right setting on the multimeter.
Main parts of a multimeter
- Probes (red & black wire).
- Dial(knob) to select a function and a range.
- Jacks are the ports at the bottom, where red and black probes are inserted in the multimeter, such as the COM, VmAΩ, and 10A ports.
- Buttons in advanced multimeters for extra functions such as Range, Min/Max, etc.
- Multimeter display(screen) to show tested readings.
Before you select the function, set up your multimeter. Insert the red probe in the VmAΩ port and the black probe in the COM port.
Functions of a multimeter
The important thing to learn is how to select functions and ranges and understand symbols on a multimeter. You must know the function’s symbol, such as resistance or voltage V.
-
AC Voltage(V〜)
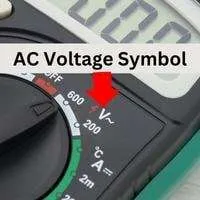
To measure the voltage of an AC circuit, select the Symbol for AC voltage on your multimeter “VAC or V〜.“
If your multimeter doesn’t have an auto-ranging function, select a range given under the AC voltage sign(V〜), such as volts or millivolts, above the voltage of the circuit you are testing.
AC Millivolts (m or mV under V〜)
A millivolt is the subunit of a volt, and to measure AC voltage less than a volt, we select the AC millivolt range with a sign m or mv under the VAC or V〜.
-
DC Voltage(V⎓)
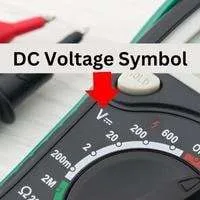
With a DC voltage setting, you can test the voltage of a battery or a circuit powered by a battery. To use DC voltage, turn the multimeter knob to DC voltage, connect the red probe to the positive terminal, and the black probe to the negative terminal, and check the results.
Under an AC voltage sign, you’ll find different subranges, such as volts and millivolts. You have to select a range above the circuit you are testing.
DC Millivolts (m or mV under V⎓)
Like AC millivolts, we select the DC millivolts to range under the VDC or V⎓ symbol to measure voltage less than a volt in a battery-powered circuit.
-
AC Amperage(A〜)
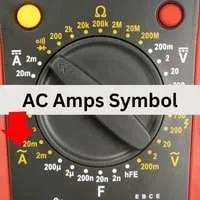
To test the amperage of an AC circuit, we select the A〜(SI unit of AC amps) sign. Under the AC amp sign(A〜), we must select a range such as amps(A), milliamps(mA), or microamps(µA).
Milliamp is the thousandth part of an amp (1/1000), and microamp is the millionth part (1/1000000) of an amp.
-
DC amperage(A⎓)
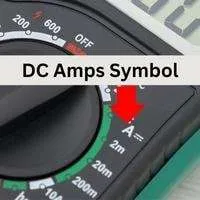
DC amps(A⎓) setting on a multimeter measures the amperage of a DC circuit (powered by a battery).
To measure DC amps, rotate the multimeter knob to the A⎓ (SI unit of DC amps)and select the desired range, more than the circuit you are testing.
-
Resistance(Ω)
Resistance is the measure of the pressure or force that opposes the circuit flowing in a circuit or conductor. To measure resistance, set your multimeter to the ohm symbol Ω (SI unit of resistance) and select a range, such as ohms or kiloohms.
-
Continuity ‘)))‘

The multimeter’s continuity function helps you identify if the path is broken or complete.
The multimeter passes some current from its battery and checks if the current is passing through the entire circuit(probes and tested conductor). To test continuity, set your multimeter to ))) (volume or diode) sign.
-
Capacitance (F)
In some advanced multimeters, you can test the capacitance of a circuit or capacitor. Capacitance is the ability of a conductor or circuit to store an electrical charge denoted by C=q/v.
Rotate the multimeter’s knob to the F sign to measure capacitance. Also, select the appropriate range, such as mF (microfarad) or nF (nanofarad).
-
Diode Test (⇥)
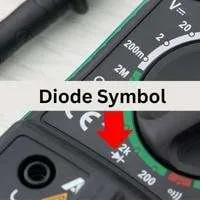
By selecting the diode function, you’ll be able to check whether the tested diode is fine. The diode symbol is a vertical line above an arrow.
Units and Subunits On A Multimeter
While testing some electrical quantities, such as voltage amperage capacitance and resistance, you test different units depending on the size of the circuit. A unit is a scale to measure electrical and other quantities, such as millivolts, megaohm, microampere, nanofarad, etc.
There are subunits such as milli (1/1000) and micro(1/1000000) that are available while testing voltage, amperages, and capacitance, such as microfarad(µF) and milliamp(mA). During Testing Resistance, you can choose kilo-ohm or megaohms, etc.
These subunits help you to measure the electrical value less than 1, such as 1 amp, 1 volt, 1 farad, 1 ohm, etc.
Ports On Multimeter
-
COM port
This port attaches the multimeter’s black probe(negative). This is considered the ground point on the multimeter.
-
VmAΩ port
The red probe is inserted in VmAΩ labeled port. This port is used in each function, such as voltage resistance amps (less than 1 amp)
-
10 A port
This port is used to insert the red probe when measuring the amperage of a circuit above 1A and between 10A. If you are measuring current above 1A, and the red probe is inserted in the VmAΩ port, your multimeter fuse will blow due to the current above range.
-
VΩ port
Some multimeters have VΩ port to measure all electrical quantities except the current.
Multimeter Buttons
-
Hold the Button
The hold button is assigned to hold the stable or ideal value of the test. With the hold function, you don’t have to instantly watch, remember or note down the reading.
The multimeter will hold the stable value of the test, and you can see it even after disconnecting the probes.
-
Min/Max Button
The Min-max function allows you to lock the minimum and maximum values in the basic functions such as volts and amps.
These minimum and maximum values will help you only measure reading between this interval. The rest of the measurements out of this range will not be measured, and the multimeter will display OL.
-
Range Button
Auto range functions automatically select what it observes as the right reading of the tested circuit.
For example, you are testing the resistance of different circuits ranging from ohms to kiloohms. The range button or function will show all the results without selecting a specific range.
While testing different circuits and variable ranges, the range function on your multimeter will automatically detect all ranges.
How do you use a multimeter step by step?
- First of all, you have to insert the red and black probe in the port on the multimeter. The Black probe goes to the COM port and the red probe to the VmAΩ port.
- Now rotate the dial to a specific function you want to use. Every function on the multimeter is assigned a sign: AC voltage is ‘VAC or V〜,’ DC voltage is ‘VDC or V(),‘ and resistance is Ω.
- Also, select a range under the symbol. In a manual ranging multimeter, It’s necessary to select a range above the circuit you are testing. The auto-ranging multimeter will automatically detect any range.
- Now turn on your multimeter with the power button.
- Connect the red probe to the live(+ve) wire and the black probe to the ground wire(-ve).
- If you are testing the DC circuit, attach the red probe to the positive terminal or the wire connected to the positive terminal and the black probe to the negative terminal.
- The multimeter will display the tested reading on display.
- If the multimeter reads OL, the tested circuit is broken (incomplete).
Conclusion
A multimeter can be precisely used after you have complete knowledge of its symbols and buttons. Beginners should learn the most basic functions, such as voltage(), current(), and resistance() measurements, which are used in everyday life electrical tests.
Read the complete guide above about the multimeter’s basic function symbols and settings.
Related Guide:


