It’s necessary to know how to test the PC power supply using a multimeter or any available tool because the power supply unit can damage your device.
When attempting to identify computer problems, testing your computer’s power supply is essential, and it should be your first step if you’re having issues with your system.
Fortunately, this can be done quickly and needs a few simple instruments. Here’s how to quickly test your desktop PC’s power supply to find any potential problems and resolve them.
Table of Contents
ToggleHow to test PC power supply with multimeter
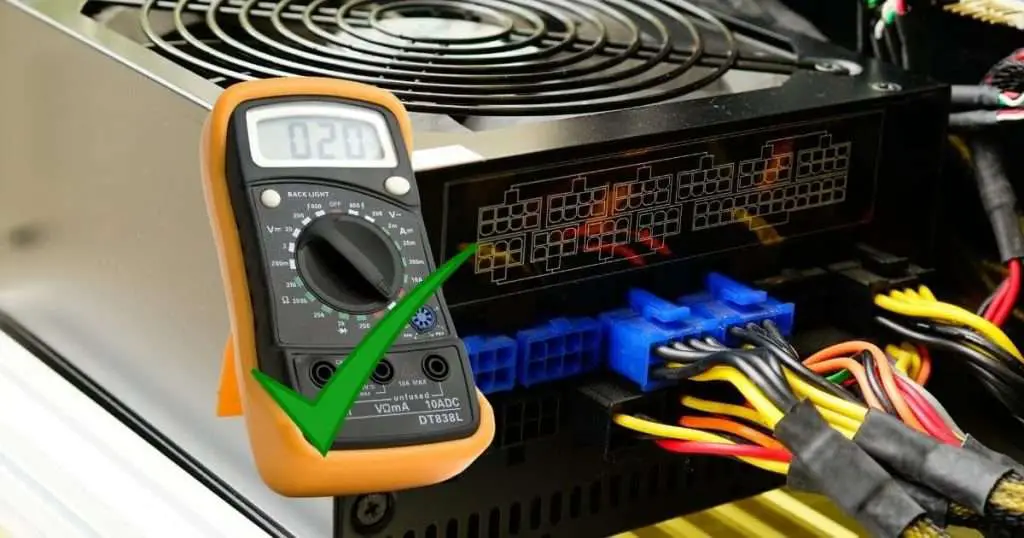
It’s essential to know how to test a power supply unit (PSU) using a multimeter correctly to evaluate the power supply unit of your PC
Let’s start the test:
Step 1: Review the PC repair safety advice first
Before examining your power supply, confirm that the computer’s AC power has been turned off and that you are correctly grounded.
When using a computer, safety should always come first. It is essential to heed safety advice to ensure your safety while performing this activity.
To start, put on an anti-static wrist strap to shield the parts of your computer from static energy. Verify that any water or drinks do not surround you.
Additionally, keep all your tools away from the area where you are working with the computer.
Because touching any of them and any internal component of the computer will create a short ( or even cause the motherboard or other internal components to be destroyed) the motherboard and part of your system.
Step 2: Open the case of your computer
Remove the computer’s cover and unplug all of its cords. We must install the power supply unit within the case. Read the handbook or carefully examine it to learn how to remove the cover.
Step 3: Disconnect the power Connectors
Except for the PSU’s primary power connector (20/24- pin connector0, unplug all other power connectors. Verify that none of the internal components of your computer—-such as video cards, CD/DVD ROMs, hard drives, etc.—- have power connectors attached.
Step 4: Group each power Cable
Typically, power supply cables are gathered in one area of the enclosure. This facilitates access and clears out the case’s interior. It is preferable to arrange all the wires together while testing your power supply so that you can see them.
You’ll need to move them out of the way and reposition them somewhere accessible to you to accomplish this. To keep them organized, use zip-twist ties.
Step 5: On the 24- pin Motherboard, short the 2- pins
You can skip this step if your power supply has a 20 – pin connector, but if it has a 24 – pin connector, you must short pins 15 and 16. you will want a paperclip or jumper wire to do this. If you continue reading, I’ll demonstrate how to sort them out with a paperclip.
First, make the paperclip as straight as you can. Then take the paperclip’s other end and place it in pin 15 of the 24- pin connector. Next, place the paper clips opposite the end inside pin 16. After completing that, proceed to connect the 24-pin connector to your motherboard.
Step 6: Verify the voltage switch on the power supply is working
When setting up the power supply, you must ensure the voltage switch is configured for your local electrical system.
You should set the voltage to 110 volts if you reside in a nation where this is the typical outlet voltage, such as the United States. The setting should be 220 volts if you live in a nation that uses 220 volts, like most European countries.
It’s time to gather your tools and materials after ensuring the voltage setting is correct. You will want an electrical tester or multimeter to test the power source. You might also consider using safety glasses and gloves during the process.
Step 7: Connect the PSU to an active outlet
Plug your computer into an active outlet if it isn’t already powered on before starting the testing procedure. This will guarantee that the tests will have adequate power when they are run.
The power supply will still work perfectly and can be used in another computer or sold for parts, but other problems may be at play if your PC still won’t switch on after testing it.
Step 8: Start the Multimeter
Put the multimeter on the DC volts reading. Consult your multimeter’s instructions if you’re unsure about how to proceed. While some multimeters feature buttons to set the function and range, others have switches for selecting AC or DC voltage measurements.
Step 9: Checking for continuity in the 24-pin motherboard power connector
Look for the 20-pin motherboard power connector on your power supply unit to test the 24-pin power connector ( PSU).this specific connector has two individual tows with twelve pontes each.
All 24 pins are arranged in an alternating pattern. The first pin in each row shares a connection with the first pin across from it.
Follow this method and examine the rows’ pins and the motherboard’s 24-pin port for any apparent damage. If either of these two components is damaged, we might suggest having certified repairs.
Connect the red probe to the multimeter’s V/ fack. This fact is typically marked “V” or “+” (positive), and it is most likely red in color and local professional.
Step 10: Record the value that the multimeter displays
Connect the red probe to the green wire and the black probe to one of the black wires after setting your multimeter to DC Voltage. It doesn’t matter which black wire you choose because there are multiple.
However, avoiding touching both probes on the same wire is preferable because this could result in damage. Note the value on the multimeter’s display: the “input voltage. “
Step 11: Disconnect the power supply and activate the switch on the supply unit’s back.
The power switch for the power supply unit linked to your AC outlet should then be turned off. Then unplug all of your internal equipment from its power outlets. Reconnect all those components, and then note the value on the multimeter’s display as you output voltage.”
Step 12: Turn on every internal device
Turn the switch off once more and reconnect the power to all of your internal devices after you’ve tested your power supply.
Replace all the inside panels (CD/DVD), hard drives, graphics cards, etc.), reconnect your internal devices to their power supplies, and you’re ready to go! There is no need to leave anything unconnected for a lengthy time.
Step 13: Connect your power source
The power supply is now ready to be plugged into a wall socket or a power strip. Your power source must be the only thing hooked into the power strip or surge protector. Other plugged-in devices could interfere with the test and cause issues.
Step 14: Repeat Steps 9, 10
Again repeat steps 9 and 10and to check continuity in the 24-pin power connector and evaluate readings.
Step 15:Unplugging the computer after testing is complete
After completing the test, shut down your computer. Before beginning any troubleshooting or repair operation, it’s crucial to unplug all of the components from your computer.
Conclusion
Hopefully, we’ve explained this well enough that you can now test your PC’s power supply using a multimeter. If something is missing, check out the video tutorial below
Related Guides:


