
This article gives you an easy way to check for a battery drain with a multimeter in the easy step-by-step guide. After reading this article, you have all the essential knowledge you require to determine whether battery drain is occurring with a multimeter. Therefore, even though checking for battery drain with a multimeter can occasionally appear difficult since it takes a lot of time, doing so is crucial.
As a result, you will be able to utilize your vehicle more effectively and stay clear of any unexpected problems while you are on the road, ensuring your safety.
Battery drain often occurs when there is constant energy emancipation when you turn on your engine, and this typically arises owing to an occurrence of a short circuit.
But a bad alternator diode or a bad battery might also be the source of significant battery depletion; therefore, it is a good idea to check these two routinely. A parasitic pull usually drains all the power from your battery quickly, depending on the amount of energy being released.
Cause of battery drain
When you turn on your engine, a short circuit is usually the cause of a battery drain. But a severely drained battery can also be caused by a bad battery or an alternator diode, so it’s wise always to check these two things. Depending on how much energy is being given off, a parasitic draw can drain your battery in a short amount of time.
How to check for a battery drain with a multimeter
Although it is uncommon, frequently checking a car battery for voltage reductions could be a great preventative measure. For your automobile to operate well at all times, it’s crucial to perform this battery check.
You can quickly learn how to use a multimeter to check for battery drain with the assistance of this piece of writing. We will assist you in determining the root cause of a battery problem and how to resolve it.
With a multimeter, you need to follow this 4-step Guide,
- Disconnect the cable from the negative car battery.
- Verify the negative cable and battery posts by drawing a line across them.
- Fuse replacement.
- Isolate and Fix the Problem.
Before starting the procedure, you should be careful about,
- Make sure your battery is fully charged.
- The voltage should be close to 12.6V.
- Consequently, even if your machine is off, turn off all of its accessories, and take your key out of the ignition switch.
- Unplug the appliance from the power supply.
Here are the things you should keep in your hand to avoid malfunctioning.
- A pair of pliers to remove the fuse from the panel.
- Digital Multimeter to perform the test.
- A wrench to detach the battery terminals.
Check the battery drain with a multimeter
4-Step Guide:
Here is the step-by-step guide on how to check for a battery drain with a multimeter.
You avoid any errors that cost you money, so follow these basic procedures exactly.
Disconnect the cable from the negative car battery
The negative cable from the battery cable termination needs to be removed. If you are performing the test from the positive end, this is done to prevent shorting out the battery.
In most cases, the negative cable is black. The cable may occasionally need to be unscrewed with a wrench.
Verify the negative cable and battery posts by drawing a line across them
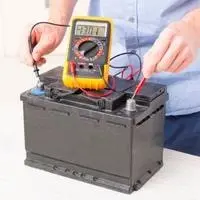
You then bolt the negative cable back on and connect the multimeter. The black probe should be attached to the common multimeter input, denoted by the letters “COM.” Input for amps (A) is where the red probe is inserted.
I advise purchasing a multimeter with a 20 amp maximum recording capacity if you want accurate data. The reason is that a fully charged battery will display 12.6 volts. The dial reads amps, and then.
We are placing the red probe through the metal portion of the battery’s negative terminal once the multimeter has been set up. Onto the battery terminal should be placed the black probe.
Fuse replacement
Removing all the fuses and replacing them one at a time is one of the most popular techniques for checking for parasitic battery depletion. As you do this, keep an eye on the multimeter readings.
Note any changes in the multimeter reading. The parasitic battery drain is caused by a fuse that causes the multimeter reading to decline.
If you are certain that the fuse is causing the parasitic drain, you must take it out and put another one in its place. You can take it out, reconnect the battery, and see if that is the only thing draining it.
Isolate and Fix the Problem
You can pinpoint the issue and resolve it if you remove a fuse or a circuit and find that it is the one that is malfunctioning. If it is a complete circuit, you can take out the separate parts while monitoring the multimeter decline. To determine the proper placement of each component, consider consulting the manufacturer’s drawings.
After identifying the problem, you can either attempt to resolve it yourself or, if unsure, have a mechanic resolve it. The component can usually be turned off or removed from the system to solve the issue.
I advise performing another test to ensure that the drain test was successful and everything is operating correctly. You can replace the battery cable with the negative terminal once the parasitic drain has been eliminated.
Note: For some autos, you must use the wrench once more to make it tight and difficult to remove. Just swap out the connection to the terminal and the cover for the other automobiles.
How can I figure out what’s causing my car battery to die?
You can do a few things to figure out why your car battery is going dead quickly. First, check for obvious problems, like lights that are still on or a charging system that isn’t working right. If those aren’t the problem, you can try other troubleshooting steps to determine what is wrong.
One thing you can do is look for corrosion on the battery terminals. If the terminals are corroded, they might not make a good connection, which can cause the battery to drain. You can clean the terminals with a wire brush or a mix of bakery soda and water.
You can also check to see if the alternator belt is broken or too tight. If the belt is too loose, the alternator might not charge the battery right, which could cause the battery to die. If you can’t figure out why the battery is draining, you may need to have your car checked out by a mechanic.
Frequently Asked Questions
What should a multimeter show for a 12-volt battery?
A 12-volt battery should show somewhere between 12.6 and 12.8 volts.
How do you find out if a battery works?
A multimeter can be used to check if a battery isn’t working as well as it should. If the multimeter reads less than the battery’s original power (for example, if a 12V battery reads 10V or less), the battery is damaged.
How do you use a multimeter to test an AA battery?
Connect the Red probe’s wires to the positive terminal and the Black probe’s wires to the negative terminal. The reading should show up on the display of the multimeter.
How do I use a multimeter to test a 12-volt?
Set the range on the DC side of the multimeter to 20V. The black probe of the multimeter goes into the negative end of the battery, and the red probe goes into the positive end.
How to use a multimeter to test a car battery?
First, turn on the headlights to drain the battery’s surface charge. If you have to, take the battery outside. If it is connected to the car, turn off everything in the car, including the clocks. Then join the two ends together (the black probe of the multimeter to the negative terminal and the red probe to the battery’s positive terminal).
Conclusion:
You have all the essential knowledge you require if you want to discover how to use a multimeter to check for battery drain after reading this article. So even though using a multimeter to check for battery loss might be time-consuming and occasionally seem difficult, doing so is crucial.
As a result, you will be able to utilize your vehicle more effectively and stay clear of any unexpected driving problems, ensuring your safety.
Related Guides:


