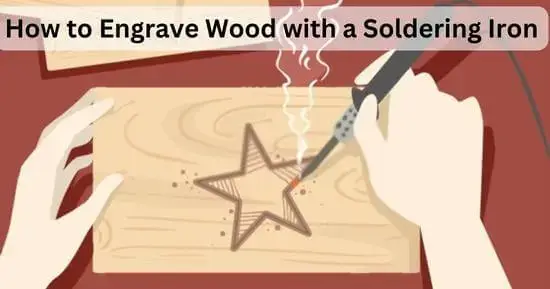
Learn how to engrave wood with a soldering iron and add unique designs to your woodworking projects. This guide provides the steps and tips to achieve beautiful results, whether you’re a DIY enthusiast or new to woodworking.
The work done mainly by the soldering iron is to solder two things together or join two materials to get firmly attached, like soldering plastic pipes and many other things. Doing tasks like engraving wood is easily achievable with the help of soldering iron.
However, this may be challenging as people who like doing these things have special tools. But in some cases, if you want to experience something new and have a soldering iron at home and try your skills on it, too, it is very classy to engrave by using the soldering iron.
You can make different designs and write alphabets or quotes on the wood using soldering iron for engraving. Even professionals also use soldering iron because it is quite an easy and fast process, saving them time.
Suppose you want to get your hands on your soldering iron and want to engrave the wood beautifully. In that case, proper guidance is required for this, and by following the advice, you can better learn the engraving timber procedure by using an easy-to-handle soldering iron.
What is soldering iron?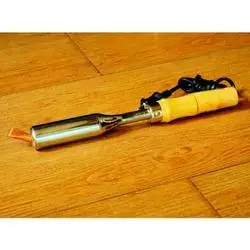
Before moving towards using the soldering iron for engraving wood, first, you should know some basics of the soldering iron so that you can easily understand the whole engraving procedure.
A soldering iron is a tool that looks like a rod and has a very sharp and thin tip at one end from which tasks like engraving and soldering are done. The soldering iron is heated over a high temperature, and when the iron gets heated enough, we can perform so many amazing things by using this tiny tip.
So use the soldering iron for the engraving if you know how to handle a soldering iron. If you are going to practice soldering iron and engraving both together, it might not go well for you because these things are not to play with. Follow the guidelines with a good understanding ability so that you can understand the exact procedure of engraving wood with the help of a soldering iron.
How to engrave wood with a soldering iron?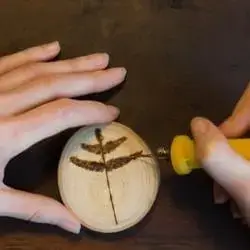
After understanding the soldering iron as a tool, you might now move towards engraving wood using the soldering iron. But before directly starting the procedure, ensure you have all the essential tools and materials.
Material and tools required:
- Soldering iron
- Bowl full of water
- A set of soldering iron tips
- Sandpaper
- Sponge
- Charcoal pencils
- Wood piece
After arranging all these materials for it, now be ready to show your artistry on the wood with the help of soldering iron.
Precautionary measure:
As you are now going to use our soldering iron, make sure you are wearing protective gloves because the solving iron is a hot tool, so you might burn your hand if you are not wearing protective gloves. Moreover, do not touch the hot tip of the following iron and try this in the presence of someone skilled so that you can have a back in the case of any problem.
How to engrave wood with a soldering iron (step-by-step guide)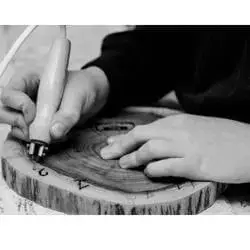
Here is the complete step-by-step guide to engraving wood with a soldering iron:
Step 1: Refine the wood
Before drawing anything on the wood or starting engraving, ensure the wood has a fine and smooth surface. Although you have bought a professional wood piece for your work, refining is mandatory.
So, take sandpaper and refine the wood surface so no fiber piece can cause hurdles during engraving. You can repeat this step two times to ensure that you have enough smooth surface for engraving as engraving a rough surface wood will be a waste of time.
Step 2: Draw the sketch
After refining the wood, you must draw the sketch or any art you want to engrave on your wood exactly. Take your special charcoal pencils and mark the skill you wish to with the soldering iron.
If you think it looks not very interesting, you can highlight the path for the soldering iron so that you can perform this whole procedure efficiently. Take your time and draw the entire craft nicely.
Step 3: Wet the sponge
Take your sponge and put it in the bowl of water to make it wet. It is necessary because you will need a damp sponge engraving wood with the soldering iron. But don’t mess up with the water. Only take the required amount of water in the bowl and half dip the sponge in the water so that the sponge doesn’t start dripping.
Important Note: Make sure the water doesn’t dip from the sponge because you only have to use a wet sponge for some cleaning purposes next in the process.
Step 4: Set the soldering iron
After all the necessary preparations, you have to move toward the soldering iron. You have to set the soldering iron according to the type of work you will do with it. So to engrave the wood with the soldering iron, you have to heat the soldering iron at 20 watts. Depending on the line depth you want to engrave with the soldering iron, you can increase or decrease the heat amount.
Step 5: Start engraving
Now you have to hold the hot soldering iron carefully and start engraving the wood by following the pattern you have drawn on the wood. Make sure you follow the exact pattern without being in a hurry, follow the whole art smoothly, and draw your desired shapes and alphabets on the wood with the help of the soldering iron.
Please do not push the soldering iron inside to have a deep line; increase the temperature for it; otherwise, it will create a hole in your wood, and all the work will go in vain.
Importance note: clean the tip of your soldering iron while engraving the wood after 2 to 3 minutes. It is necessary to perform good-quality work. Use the wet sponge for this.
Step 6: Do the necessary cleaning
After engraving the wood with the soldering iron, you must clean the wood surface. Dust off all the wooden residue from the surface and erase all the lines you have drawn with the charcoal pencil if they are visible from somewhere, as you have to give a fine look to your work.
Important Note: While cleaning, turn off the soldering iron first and then start doing this all. Don’t let the soldering iron ON for a long time idly.
Benefits of using soldering iron for engraving
Although you can use many other excellent tools for engraving wood, a soldering iron has many benefits. The benefits of using soldering iron for wood engraving are given below.
- You don’t have to arrange or buy any other expensive thing as you can do this all with the stuff at home.
- You don’t have to arrange many heating substances as the soldering iron can make this task easier.
- The quality of the work is impressive, as the soldering iron does a permanent job.
- You can even do this if you are not a professional or want to do some crafting while at home.
- Because of its sharp and fine tip, you can even engrave some complex designs on the wood using the soldering iron.
Final verdict
Making unique designs and crafting works like engraving wood is now becoming famous as people have outstanding artistic skills. If you have some free time and want to cash this time by drawing amazing things to increase the aesthetic look of your place, then you can engrave the wood with the soldering iron for this. You only require a few skills and professional tools.
Moreover, you can do this while sitting on the floor of your sitting area so that you don’t have to arrange a special space. The soldering iron makes it all easy for you. So try wood engraving with a soldering iron at home now.
Related Guides:


