If the switch breaker is not working correctly, it may have tripped the breaker or blown a fuse. Reset the breaker if it is tripped, and replace the fuse if blown. So it’s necessary to test a light switch for your device’s proper functioning and safety with a multimeter or any other means.
The light switch can last for 20 years and wear out primarily because of using them repeatedly or a loose connection.
In this post, you’ll learn how to identify a fault in the light switch by testing with a multimeter.
Working on a Light switch
A light switch is a device that interrupts the flow of the current. It comes in different styles. When the switch is closed, current flows through the electrical device(light).
When the switch is turned off, the circuit will open(break), stopping the current from flowing in the circuit, and your light will be off.
Signs of a bad light switch
- The light switch gets too warm.
- The fuse burns continuously.
- Light switch burns.
- Low lights
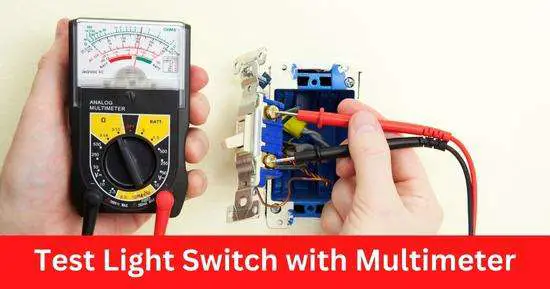
How to Test a Light Switch with a Multimeter
To test a light switch
- Set your multimeter to ohms or continuity.
- Connect both multimeter probes to the terminals of the light switch.
- When the light switch is off, the multimeter will display 1 or OL, which means an open loop (open circuit).
- When the light switch is turned on, the multimeter will show around 0 ohms, which means an excellent current path.
Also, test the voltage of the light switch by
- Setting your multimeter to AC voltage(V〜).
- Connect the red probe to the live terminal() and the black probe to the ground terminal.
- If the light switch is fine and utilizing maximum voltage, the multimeter will show around 120V or 240V
Follow the step-by-step testing guide for a light switch below:
Step 1: Tools required to test a light switch
Tools that’ll be used for testing the light switch are:
- Multimeter
- Screwdriver(to unscrew an outlet)
Step 2: Safety Measures
Make sure to turn off the power supply while testing resistance, as resistance tests don’t require voltage(power).
Wear safety gloves, as we’ll be working with high-voltage wires.
If you visually monitor a problem with light switches, you should replace all of them to avoid the possibility of a fire.
Once you have tested the light switch and found it to be fine, mount it back to the socket.
Step 3: Resistance or Continuity Test
First, we’ll test the light switch’s inner resistance (continuity). It’ll help you evaluate whether the light switch circuit is fine.
First, disconnect the power supply and unscrew the light switch input wires.
Now set your multimeter to continuity or resistance (Ω). Both of these settings will check the continuity (path) of the light switch.
Now connect both the multimeter probes to the terminals of the light switch. You can place probes in any direction because continuity and resistance are non-directional.
When your light switch is in on position(downward), the circuit is complete in the switch. Your multimeter will display continuity or 0 ohms which means the current supply path(circuit) is fine.
Now turn the light switch off by turning the front plastic cover upwards, which will break the circuit. Now connect both multimeter probes to the light switch terminals. The multimeter will show OL or 1, meaning the circuit is broken. This is because the switch is in the off position, and the circuit is broken.
Step 4: Voltage Test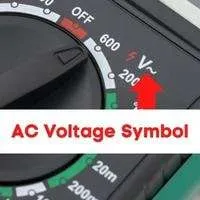
Now we’ll test the voltage of the outlet or receptacle where the light switch is installed. We can test the voltage of the light switch when it’s installed in the circuit or if it is removed.
Set your multimeter to AC voltage symbol (A〜) at a higher range above 240V.
Connect the black probe to the ground wire terminal of the light switch and the red probe to the live wire terminal.
The multimeter will show you the maximum voltage, such as 120 or 240V.
If the multimeter reads quite less than the maximum voltage of your home supply, then the wires are damaged and leaking current.
How to test a dimmer switch with a multimeter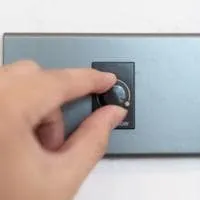
You can test a dimmer by checking continuity in dimmer wires and setting your multimeter to ohm or continuity symbol. If the multimeter beeps or shows around 0ohm resistance, the circuit in the dimmer is fine.
Also, test the voltage change in the dimmer by setting your multimeter to AC voltage ‘〜‘ (above 240V).
Connect the black probe to the ground terminal of the dimmer. Attach the red probe to the live terminal of the dimmer. Your multimeter will show you the voltage of the light switch.
Now, if you rotate the dimmer’s knob, you’ll see a voltage change on the multimeter. This voltage change indicates that your dimmer is working finely.
In this way, you’ll be able to test the voltage the switch allows to pass through it while the knob is rotated.
How to test 3 way light switch with a multimeter
A 3-way light switch is used to operate a light (or set of lights) from 2 different sockets or locations. The 3-way light switch will have three terminals, two of which are travelers terminals and one is a common terminal.
To test a light switch, connect one probe to the common terminal screw (black or dark color) and a second probe to the traveler terminal(brass) above the common terminal.
Turn the light socket on (downward), and your multimeter should read OL (open loop). When you turn on the switch (upward), the multimeter will beep or show 0 ohms, which means excellent continuity.
Now we’ll test the second traveler terminal with the common terminal. Insert one probe on the common terminal screw(black) and the second probe on the brass screw under the green screw(green) on the opposite side.
When the light switch is in the off(upward) position multimeter will display OL and 0 ohms while the switch is turned down.
Conclusion
The multimeter is a versatile electrical testing machine tester that measures electrical properties such as voltage, current, resistance, and continuity. You should ensure that the switch is off before you make the wiring connection and shut off the power switch.
Sometimes, minor issues can cause more significant problems. The loose wire connection can cause the failure of a light switch. But when you reconnect the wires correctly. The multimeter will assist you in evaluating a light switch by testing the circuit’s continuity(flow in the path) and voltage.
I hope this guide will help you test a light switch with a multimeter.
Related Guides:


