
It’s surprising to install a new bulb in your light socket that doesn’t glow. In this post, you’ll learn how to test a light socket with a multimeter by following a few simple tests.
A light socket or lamp could be faulty due to damaged wires or a blown plug. Using a multimeter, we check for continuity in different components and voltage reaching the socket. First of all, visually inspect for damaged wires to prevent further hustle.
Let’s get started to explore further…
How to test a light socket with a multimeter?
While testing a light socket with a multimeter, we check the voltage bulb is getting from the power source through the light socket and the continuity between its different components.
Set the multimeter to AC voltage, connect one probe to the metal shell inside the socket, and the second probe to the central metal piece that combines the bulb to supply power.
If your light socket works fine, the multimeter should read the same voltage your room outlets provide, such as 120 or 240 volts. Also, check the continuity between different components of the socket.
Below we’ll explain step by step how to test a light socket.
Test 1: Test the voltage of the light socket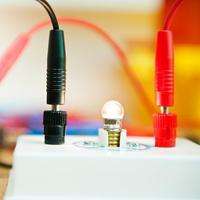
You are doing a voltage test that lets you know if your lamp or light socket is getting enough current to light the bulb.
A short circuit may cause a voltage drop across the light socket, and we must detect it with a multimeter.
Follow step-by-step:
Set Multimeter
Turn on your multimeter and set the dial to measure AC voltage represented by V~.
Attach probes to socket parts
Get the bulb out of the socket and attach the light socket to the power supply.
Connect one probe to the metal shell that holds the bulb and the other probe to the copper or brass metal at the center of the light socket.
Don’t let the probes touch each other or any other component of the light socket.
Evaluate multimeter reading
If the outlet where the light socket is connected gives 120 volts, the multimeter should also read around 120 volts from the light socket.
It means that the maximum current reaches the light socket without any hurdle. Same as if your outlet gives 240 volts, the multimeter should read around 240 volts from the light socket.
If the multimeter reads too low a voltage in the light socket compared to the outlet, less current reaches the light socket, possibly due to a short circuit, damaged wires, or loose connection.
Test 2: Test continuity in wires and socket
By testing continuity, we can determine the wires’ condition and connectivity to the light socket.
Set Multimeter
Set your multimeter to continuity or resistance setting. Both settings will detect continuity between components.
Test continuity in-ground wire and socket
Connect one probe to the metal shell that holds the bulb. It is the ground component of the socket.
Connect the other probe to each prong of the male input plug because we can’t decide which prong is a hot or ground terminal before testing.
You’ll get a resistance reading when the probe touches the ground prong because now both probes are connected to the ground components.
Evaluate Results
If the multimeter shows resistance to near zero, there is excellent continuity in-ground wire and socket.
If the multimeter displays OL or one on all connections, there is no connectivity between the ground terminal at the male plug and the grounded shell.
Test continuity in live Wire and socket
Connect one probe to the metal piece at the center of the light socket. It’s the hot component that supplies power to the bulb.
Connect the second probe to the male plug prongs one by one. You’ll get a reading when the probe connects the live prong because hot components are connected at both ends.
Evaluate Results
Any prong must show resistance on the multimeter if there is continuity. Low resistance means excellent current carrying capability.
If your multimeter reads too high resistance, there is continuity, but something is wrong, such as a loose connection or damaged wiring that hinders the maximum current flow.
Test 3: Test short circuit between non-circuited metal parts
If testing a lamp, connect one probe to the live terminal (metal piece at the center of the socket) and the second probe to any metal part of your lamp (that doesn’t belong to the circuit) to check for a short circuit.
In the same way, check the continuity between the components of the light socket and the male plug with the non-circuited metal parts of the lamp.
How to test a bulb with a multimeter?
Using an LED or a fluorescent bulb might be challenging to determine if the bulb is faulty or if the socket is visual. You can use a multimeter to know if the bulb is working or is expired.
Set the multimeter to the continuity or resistance setting, and connect one probe to the round metal case of the bulb and the second probe to the bulb’s metal base.
When connected to both metallic parts, the multimeter will show resistance, continuity, or beeps for a working bulb.
However, Getting the one or OL reading means an open loop due to the expired bulb.
How to test a bulb without a multimeter?
Get two pieces of wires and a bulb to test. Peel the insulation from one end of both cables.
Connect one wire end to the round metal body and the other wire end to the bulb’s metal base. Use electric tape to stick wires on the bulb.
Insert the other ends of both wires into a socket, or connect to any additional power supply.
If the bulb is not expired, it’ll start glowing.
How to test a ceiling light with a multimeter?
A ceiling light is tested the same as a lamp. First, turn on the power supply to the ceiling light. Set the multimeter to AC voltage, connect one probe to the metal case that holds the bulb, and the second probe to the metal hub (metal piece at socket center).
Your ceiling light works well if you get the voltage nearest to your outlet supply (120 or 240). For example, your outlet provides 120 V to each appliance, so the multimeter should read between 110-120 V from an efficiently working ceiling light.
How to test a light socket with a voltage tester?
Using a non-contact voltage tester, you can check if the current reaches from the input power plug to the bulb.
Attach the light socket to the power supply. Turn your voltage tester on, get its thin end near the light socket, and move it inside.
If the current reaches the light socket, the voltage tester will blink.
On the other hand, if there is a broken current path, the current might not reach the socket, and the voltage tester will not glow, which means there is no current detected.
Also, pass the voltage tester through the entire wire to detect the broken point.
Conclusion
Checking a light socket is relatively easy using a multimeter. Don’t forget to have safety measures such as insulated gloves because we have to work with live wires to test a light socket.
Before starting any test, visually inspect for external damage. Follow the resistance and continuity test stated above to evaluate the working of your light socket.
After reading this guide, you’ll successfully troubleshoot your light socket.
Related Posts:


