You are in the right place if you are searching for test a speaker output with a multimeter.
A quality speaker is essential to hearing as it fascinates listeners with smooth sound waves. If your speaker is not producing quality sound or is completely unable, you can figure out the reason for poor output using a multimeter.
By measuring the resistance, you can evaluate the efficiency of the current flow and the quality of the wires inside the speaker.
In this post, you’ll learn how to test a speaker output with a multimeter or battery, testing speaker wires’ polarity to identify positive and negative wires and the speaker’s wattage.
How to Test a Speaker Output with a Multimeter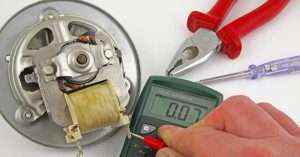
To determine how well the speaker produces output (sound), you have to measure resistance, as high or low resistance can influence sound quality.
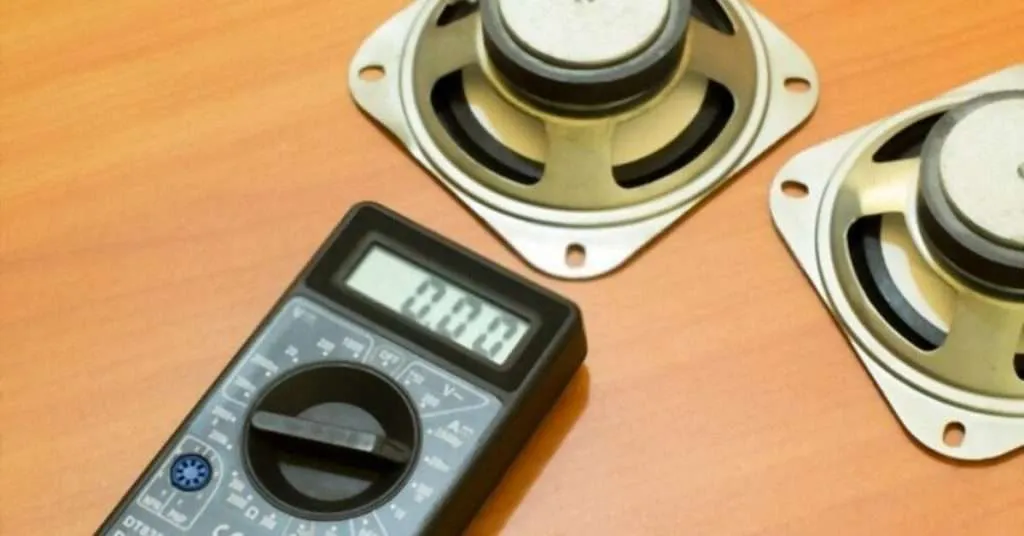
To calculate speaker resistance (impedance), set the multimeter to resistance Ω and connect the probes to the input wires or terminals of the speaker.
If you get OL, there is no connectivity (broken circuit). If you get a reading on a multimeter, it should be less or equal to the maximum impedance limit labeled behind the speaker.
Suppose your speaker’s maximum resistance limit is 8 Ω. Then, a somewhat working speaker multimeter should read 8 ohms or less.
Speaker resistance is impedance, usually 15% higher than resistance due to the added reactance factor. There is no option to measure impedance on a multimeter, so we assume resistance reading as impedance.
Also, impedance is measured on AC, while the multimeter supplies DC through its battery.
To test your speaker output, follow this step-by-step guide.
-
Get the Speaker out of Case or Device
Detach speakers from any power source and take them out of the case or device to properly investigate. Inspect for any physical damage.
Remove wires for an accurate reading if speaker input wires are not soldered (permanently joined) to the input terminal.
-
Setup Multimeter to Resistance
To measure resistance, set your multimeter to the ohm (Ω) setting, and adjust the minimum resistance range through the dial, such as 20Ω.
Connect multimeter probes to the input terminals of speakers. Resistance is non-directional so that you can connect probes in any sequence.
-
Evaluate Multimeter Reading
Compare the multimeter reading with the maximum resistance range of speakers. Speakers used at home usually have 4 or 8 Ω resistance.
You can find the impedance limit labeled at the back of the speaker or in the manufacturer’s manual. A quality speaker should have a resistance below or equal to the maximum limit.
If the multimeter reads above the speaker’s maximum impedance, it indicates faulty wiring, making it hard for the current to flow and produce quality sound.
A multimeter displays an OL means an open line or short circuit. There is no continuity in wires, and it’s a reason for your speakers’ failure.
How to test the polarity of speaker wires
The polarity of speaker wires is the identification of negative and positive input wires or terminals. We can test polarity in three ways.
-
Inspect Wire Color and Signs
You can check the polarity of speaker wires with a color code. The red wire is supposed to be positive, and the black is negative. Also, the wire terminals are labeled with positive and negative signs.
-
Voltage Test Using Multimeter
You can also do a voltage test to check the speaker wire’s polarity with a multimeter. Set the multimeter to AC voltage and connect both probes to the input wires of the speaker.
If you get positive voltage reading (without a – sign), the wire connected to the red probe is positive, and the other is negative. So if you get a negative voltage reading, the positive wire is connected to the black probe, and the negative is connected to the red probe.
-
Test with a Battery
If you can’t distinguish by color or don’t have a multimeter, connect both wires of the speaker to the poles of a battery(less than 9 V) for a short interval. If the speaker cone moves outwards, the positive wire is connected to the positive pole and the negative wire to the negative pole.
So if the cone moves inwards, the positive wire is attached to the negative pole, and the negative wire is attached to the battery’s positive pole, which means that polarity is reversed.
How to measure speaker wattage with a Multimeter?
Measure the output voltage of the amplifier. Set the multimeter to AC voltage and insert both probes into the amplifier’s output terminals (where speaker leads are connected).
Play music of constant frequency (such as 50 Hz) at maximum volume and note the highest voltage reading on the multimeter.
Find the amperes of your speaker given in the manual or labeled on the backside of the speakers. Multiply the voltage of the amplifier with the speaker ampere as Watts = Amps x Volts.
In another way, measure the resistance between both wires of the speaker. Use formulae of V2/R to calculate the wattage of speakers.
How to Test Car Speakers with a multimeter?
Get the speaker out of the car and check the resistance value at the speaker’s backside. Now set the multimeter to ohms and connect probes to the input wires of the speaker.
A working speaker must have resistance around the limit labeled on the speaker. If your multimeter reads 1 or OL, there is a broken wire or faulty component.
How to Test Speaker with a Battery
Without a multimeter, you can also determine whether your speaker is usable.
- To test a speaker with a battery, take a battery of 9 V or below and two pieces of wires. Attach wires to both battery poles.
- Now connect the positive pole wire at the positive terminal of the speaker. Connect negative pole wire with negative terminals.
- If your speaker already has input wires, attach the positive terminal wire to the battery’s positive pole and the negative terminal wire to the negative pole.
- Remember, for minimum intervals, such as a second, you must make a connection. A speaker operates on an AC, and a DC battery current can damage wires due to overheating.
- The cone will move inward or outward with a clicking sound in a finely working speaker. A bad speaker has no movement in the cone while connected to the battery.
Conclusion
Testing a speaker using a multimeter or a small battery is easy. Using a multimeter, you can identify the quality of wiring or any damage by comparing the resistance between speaker wires to the recommended impedance limit labeled at the speaker.
Using a battery, you can determine whether a speaker is working and the polarity of wires. Hopefully, you’ll understand how to test a speaker.
Related Guides:


