Speaker wire polarity (negative and positive direction) doesn’t matter, but when more than one speaker is connected to the same sound system, reversed wiring can cause phase cancellation. Using a multimeter, you can check your speaker’s positive and negative wires with a simple voltage test.
Identifying positive and negative speaker wires is known as polarity testing (current direction). A reversed polarity may cancel out specific frequencies, and speaker cones will move in opposite directions resulting in poor sound quality.
Let’s understand step-by-step.
Table of Contents
ToggleHow to test positive and negative speaker wires with a multimeter
Set your multimeter to a DC voltage setting to check a speaker’s positive or negative wires. Connect probes to the input terminals of the speaker. If the multimeter reads positive voltage, the positive wire is connected to the red probe and the negative wire to the black probe.
While if the multimeter reads a negative voltage, then the positive speaker wire is connected to the black probe, and the negative wire is connected to the red probe.
Let’s follow the step-by-step guide below.
Before any test, you can identify positive and negative speaker wires with the color codes. Usually, a red wire is positive, and a black is negative. In some other speakers, a red dot on an input terminal indicates a positive terminal.
-
Locate a speaker and input wires
Locate your speaker, and get it out of the box. Don’t unplug it from the wires and battery, as we have to detect positive and negative wires with DC voltage differences.
Locate the two input wires going to the speaker terminal.
-
Set Multimeter
A car speaker runs over a battery that produces DC voltage. Set your multimeter to the DC voltage setting denoted by V with dots over a straight line. Adjust a low DC voltage range as car speakers run on low voltage.
-
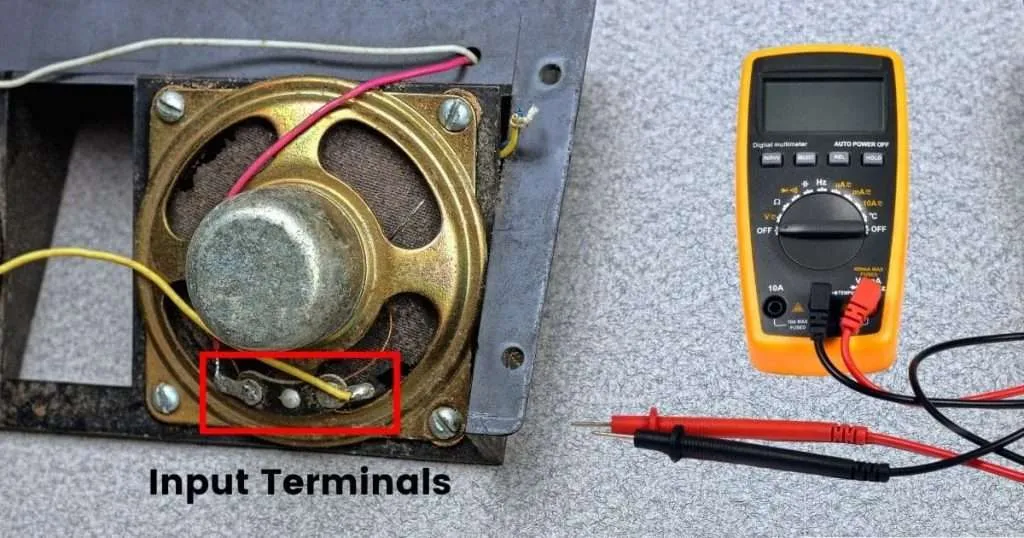
Connect Probes to Speaker input terminals
Connect both probes of the multimeter to both input terminals of the speaker. A terminal is where the input wires are joined or soldered to the speaker.
-
Identify wires by comparing reading.
The multimeter will display either positive or negative voltage readings. If your multimeter displays positive voltage, then the red probe (positive ) is connected to the positive wire, and the black probe (negative) is connected to the negative terminal of the speaker.
On the other hand, if the multimeter displays negative voltage, it means that the speaker polarity (direction) is reversed. Because the red probe is connected to the negative terminal, and the black probe is connected to the positive terminal.
Understand why a multimeter measures negative voltage when positive and negative speaker wires are reversed.
As the red probe is positive, it should be connected to a positive (live) wire. The Black probe is negative and should go to the negative wire or terminal.
When positive and negative wires are reversely connected to a multimeter, it detects the charge moving in an opposite direction from the ground probe (black) toward the live probe (red). That’s why it results in negative voltage reading.
How to test positive and negative speaker wires with a battery
If your speaker is disconnected from the sound system or power source, you can still verify its positive and negative wires with a battery.
Take a dry cell battery, such as 1.5 volts. Connect your speaker’s input wires to the positive and negative terminals of the battery.
If the speaker cone moves outward, the positive speaker wire (live) is connected to the battery’s positive terminal, and the negative wire (ground or neutral) is connected to the negative battery terminal.
In that case, If the speaker cones move inwards after connecting to the battery, the negative wire is connected to the positive battery terminal, and the positive wire is connected to the negative battery terminal.
How Do You Check Speaker Output with a multimeter?
Take the speaker out of the case, connect it to an amplifier or phone, and play a constant music frequency. Connect multimeter probes to the input terminals (join of wire). Increase the volume to the maximum range and check the multimeter reading.
Conclusion
So test positive and negative speaker wires with a multimeter; You can make a secure connection by testing positive and negative speaker wires while repairing your sound system.
Measure the voltage of input wires; a negative reading means reversed polarity. The negative wire is connected to the red probe, and the positive wire is to the black probe of your multimeter.
On the other hand, a positive voltage reading shows the right polarity, which means the positive wire is connected to the red (positive) probe and the negative wire to the black probe(negative).
Follow a simple, step-by-step guide explained above.
If you find this post helpful, share it with others and give your opinions in the comment section.
Related Guides:


