
Are you looking for “how to trace a wire with a multimeter”? Whenever installing an appliance or establishing an electric connection in your new home. You will have to trace some wires, having one end in the switchboard and the other in the ceiling or wall.
At this point, you might be confused about which ends I should pick from a bunch that belongs to the same wire.
Suppose you own a multimeter and looking for a guide to help you trace the correct wire behind the wall. We’ll discuss some easy steps to trace electrical wires in a wall using a multimeter.
How to trace a wire with a multimeter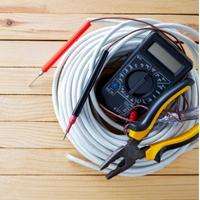
We perform a continuity or resistance test using a multimeter to trace electrical wire behind walls. Attach one probe to a wire you have to trace from one outlet.
Place the second probe on every wire from the other outlet in your room when both ends of the same wire connect to the probes.
The multimeter will beep, or the reading will change from OL to 0 in the continuity test. In the ohm setting, it’ll measure resistance. It means the circuit is complete for the current to flow in a loop.
Below we’ll follow some steps to explain the procedure:
Step 1: Switch off the electricity supply
First, turn off the power supply by lifting the liver from the main board of your house. This is necessary to prevent electric shock when you trace wires.
Step 2: From one end, extend the wire to be traced
The purpose of joining an extra wire is to reduce the distance between both ends of the wiring so that multimeter probes can be connected. Multimeter probes are not long enough to reach from one end of the room to another.
Join one end of a wire that is to be traced with the extra wire. You can make a joint using a wire nut or simply by electrical tape.
Step 3: Set up a multimeter in continuity or resistance mode
You can select continuity or resistance mode because you’ll only get a reading when the multimeter detects a complete circuit in any of these settings.
Step 4: Attach probes to detect the correct wire
Attach one probe to the end of the extended wire. Take the multimeter to the part of the room where wires are going from the first outlet to the other.
Connect the second probe to the wires of that outlet one by one.
5: Check Multimeter results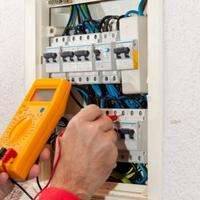
Until the same wire ends are not detected at both probes, the multimeter will return an OL reading which means that the circuit is incomplete.
After you read OL on the multimeter, remove the probe from that wire, and connect it to the other one by one.
When the multimeter reading changes from OL to 0, it indicates that you have the same wire at both ends. 0 reading in the continuity test means that the multimeter has detected a complete circuit as current flows in a loop.
If you have selected the Ohm setting after the circuit is complete. The same wire ends are attached to probes, and the multimeter will measure the resistance of the wire.
This is how you can trace wires in walls using a multimeter.
Tips:
Every wire is entirely coated with a single color, so you’ll have the same color at both ends of the wire. For example, you have selected a grey wire to trace. You should check only the grey wires at the other end to save time.
Suppose the room has multiple open wiring. You must know that a set of wires is going in which direction. Otherwise, you will have to test all outlets to trace a wire.
How to trace a wire without power?
You can still trace a wire with a multimeter if the circuit has no power. We have to check the continuity in wires to trace the required wire. First of all, make sure where the wires are going. For example, if you’re checking for a broken wire in a wall, going from one outlet to the other. So open the outlet board where you expect the ends of a wire you are tracing.
Set your multimeter to resistance or continuity, as both settings detect whether the circuit path is complete.
This way, we’ll attach one multimeter probe to one of the tracing wires. Attach the second probe to all the wires in the other outlet. Touch all the wires to the multimeter probe. If the wire has been detected/ traced at both probes of the multimeter, it will show you 0 in continuity mode and resistance in the ohm setting.
In this way, check continuity from the wire you are tracing to all wires in the circuit, and one showing continuity is the desired (traced) wire.
How to Check Broken Wire with Multimeter?
Sometimes it’s necessary to trace a wire to make a secure connection. Sometimes, we need to find out where a wire is going. We can identify or trace the desired wire by checking continuity in wires, so we use a multimeter to check whether a wire is broken.
Below we’ve discussed the complete testing in detail.
Test for a broken wire with a multimeter
Set your multimeter to resistance or continuity to test a wire for continuity (complete path). Attach one probe to the wire you are tracing. Confirm where that wire is going. Attach the second probe to all the wires in the other circuit.
The multimeter will show 1 or OL if the same wire is undetected at both ends. However, if the multimeter reads 0 or quite low resistance, the same wire has been detected at both ends.
Follow the complete step-by-step guide below.
-
Locate the wires to be traced:
First, you must know where the wire is going that’s to be traced, and it could be the other outlet in your home or between components in your car. So you must confirm where the wire is going.
Also, check the color of the wire we’re tracing. It’ll help to identify the same colored wires in the other circuits, reducing the efforts.
-
Multimeter Setting for tracing a wire:
We must test resistance (continuity) using a multimeter to test for a broken wire. Continuity is the ability of a conductor or circuit to pass current. The minimum is the resistance, and the better is the continuity (conductivity) of the current. To check if a wire is broken, we’ll check the continuity of the wire.
Insert the black probe in the COM port on your multimeter and the red probe in the VmAΩ port. Turn on your multimeter and set the knob to the resistance or continuity sign.
Touch the metal end of both probes to each other to check if the multimeter is working fine. Now take the wire that you want to check if broken or not.
Attach both multimeter probes (red & black) to both ends of the wire. If the wire is broken, the multimeter will show OL (open loop), which means that the circuit or tested conductor is broken.
You can attach multimeter probes in any direction, as continuity and resistance are non-directional. It helps to know if the tested conductor is broken or complete.
-
Evaluate Results with multimeter readings:
A perfect wire should have 0 resistance which means excellent continuity.
However, the tested wire is OK if the multimeter reads 0 or around 0 ohms.
Sometimes, the multimeter reads quite high resistance because the wire is damaged but not completely broken.
How to test for a broken wire in a car?
Following the circuit diagram, identify the wires and remember where they go. So remember where the tested (tracing) wire goes in the engine.
Set your multimeter to continuity. Touch one probe to the tracing wire and the other probe to the rest of the wires going to other components. For example, if you are testing the fuel pressure sensor wire, you have to check the wires in the sensor connector going to the ECU.
If the multimeter shows 0, the multimeter detects a complete circuit, and the wire is fine.
However, the wire is broken if the multimeter reads OL (open loop). If the multimeter reads too high resistance, the tested wire is not broken but damaged.
Frequently Asked Questions
How to trace a circuit?
To trace a circuit, follow a continuity test with a multimeter. Place one probe on a wire or a component and the other probe on different wiring parts to detect whether they are connected.
If your multimeter results in 0, the components are connected in a circuit, and the current flows. However, 1 or OL indicates an open line which means there is no continuous way for current flow.
How to trace light switch wiring?
There could be two sets of wiring, one going to the light and the other to the circuit board (outlet).
In this way, check continuity in the live-live, ground-ground, and neutral-neutral from the power end(outlet) and the light end.
Check continuity in the wires; if the multimeter shows OL, it means the wire is broken. While if the multimeter reads 0, the tested wire is fine.
How do you trace dead electrical wires?
To trace dead or broken wires from the circuit, connect one probe with a wire coming from an outlet and find its other end by connecting the second probe to wires from other outlets. Mark these wires and continue to test other wires.
The broken wires will be left at the end with an OL reading on the multimeter, as the current can’t flow in the loop. The multimeter will show 0 (continuity) when it detects a fine wire, as current flows at both ends.
How to trace a wire without power?
You can trace a wire that doesn’t have any power by attaching probes at both ends of the outlets. Select a wire to be traced from one wire outlet and connect it permanently to one probe.
Place the second probe on all wires of the other outlet. When the ends of the same wires are connected to probes, the multimeter will read 0 due to continuity at both ends.
Conclusion:
It’s easy to trace electric wires in a wall using a multimeter. A continuity or resistance test detects the same wire ends when current flows through the multimeter to the wire and back.
So in this topic, we have discussed in detail how to trace a wire with a multimeter to connect your device and the switchboard properly.
Related Guides:


