
A coil pack is an electrical component in the engine consisting of two coils wrapped around iron cores. The coil pack converts low battery voltage into thousands of volts to ignite the spark plug. In this post, we’ll learn how to test a coil pack with a multimeter but first, understand how a coil pack works.
Current from the battery enters the coil pack through the primary coil. The secondary coil converts that low voltage into a high-voltage pulse and passes it to the spark plug.
In a coil pack, the primary coil receives low voltage from the car battery(12V) and converts it into high voltage in the secondary coil.
A coil pack that converts low voltage to high voltage(output) has fewer loops in the input (primary) and more in the secondary coil.
In the same way, a coil that has more loops has a higher length of wire; thus, resistance also increases. This is also a way to identify the primary and secondary coils in the coil pack.
How to test coil pack with a multimeter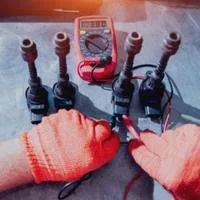
To test a coil pack, we’ll measure resistance in the primary and secondary coils of the coil pack.
- First, locate the coil pack in your engine and remove the connector coil plug.
- Set your multimeter to resistance and measure resistance in all primary coil terminals.
- Then connect resistance in the secondary coil terminals.
- The primary coil should have around 1-ohm resistance, and the secondary coil should have 12-15k ohm resistance.
Test Resistance in the Primary Coil
- Set your multimeter to resistance(ohm setting) to test the coil pack. Set 200 ohms range for testing the primary coil. The primary coil has two terminals(bolts) on the outer side of the metal body.
- Connect both multimeter probes to both primary coil terminals. You can connect multimeter probes in any direction on primary coil terminals as resistance is non-directional.
- The multimeter should read between .3-1 ohm for somewhat working ignition coils. If the multimeter reads relatively high resistance, it means that the primary coil circuit is damaged.
- If your multimeter reads OL in the primary coil, it means that the coil windings are broken, and there is no current flow in the circuit due to an incomplete path.
Test Resistance in the Secondary Coil
A secondary converts low battery voltage to high voltage to spark the plug.
To test the secondary coil, we’ll measure resistance in the high-tension cable terminal and spark plug terminal. The spark plug terminal is at the end of the tower-shaped cylinder.
- Set your multimeter to ohms at 20k ohm resistance range.
- Connect both multimeter probes (black and red)to the spark plug terminal and the HT cable terminal(high tension).
- Your multimeter should read between 12-15kΩ in the secondary coil terminal(spark plug and HT cable terminals).
- If the multimeter reads too low resistance, it means that the coil pack is short-circuited if the multimeter reads.
Frequently Asked Questions
How to test 4 pin ignition coil with a multimeter?
A 4-pin ignition coil has 4 terminals in the coil pack connector. These are the primary coil terminals, and different models have different numbers of terminals in the coil pack connector.
Set your multimeter to resistance at the 200-ohm range. Connect your multimeter to 2 out of 4 terminals in the ignition coil connector.
Test each terminal with all other terminals in the connector. All terminals of the primary coil should have the same resistance is them. Your multimeter should read around 0-1 ohm in all primary coil terminals.
How to test a coil pack without a multimeter?
Turn on the engine in the RUN position. Locate the coil pack on the engine of your vehicle. For example, the four-cylinder internal combustion engine has four spark plugs. Each cylinder in your car has an ignition coil for internal combustion. After starting the engine, unplug each coil plug one by one and check whether the engine has begun.
If the engine stops working after removing a coil, it means that the coil is fine. Now remove all coils one by one after the engine is on. After removing a coil engine doesn’t stop, which means that the coil is faulty and there is no effect on the engine after removing it.
After identifying a faulty coil pack, remove it and replace it with a new one.
How to test Ford coil Pack with a Multimeter?
To test the ford coil pack, set your multimeter to ohms and measure the resistance in the primary and the secondary coil terminals. Then compare the multimeter readings with the ideal ranges on your ford’s model manufacturer manual.
Conclusion
Remember that a louder-than-usual engine, lack of power, and dropped RPMs are signs of a poor coil pack. You can test your vehicle’s coil pack by measuring resistance in the primary and secondary coil terminals.
However, coils may have the right resistance but may malfunction. So it’s wise to remove each coil one by one and check if it affects the engine performance.
Related Guides:


