
Battery testing is an important part of maintaining your batteries, and knowing how to test them is key. This guide will teach you how to test a deep cycle battery with a multimeter.
Most electrical appliances need batteries to run. This is because the battery helps them to give an electricity supply. Any issue in the battery can cause the appliance’s malfunction, which is why the appliances’ batteries are considered essential.
If the batteries are not of good quality, they can damage the appliance’s condition. That’s why the batteries get checked most of the time so that they cannot harm the appliance, and if any damage has occurred, the issue can get resolved without further delay.
Types of batteries:
Usually, two types of batteries get installed in electrical appliances. These types are:
-
Starting batteries
Starting batteries are the ones that are required by the appliance to get started. It means that these batteries give a sudden jerk to the appliance by providing an enormous amount of current at the start. These batteries only play their role in starting the appliance, so that’s why they only come in a short period of use by the appliance.
-
Deep cycle batteries
Electrical appliances for the constant supply of electric current require deep-cycle batteries. These batteries supply a low and continuous amount of electricity to the machine to keep receiving the appropriate amount of current to work. These batteries are present in many electrical appliances, vehicles, and solar panels.
Among these two types of batteries, the second type, deep cycle batteries, are the ones that are used the most by the appliance or are used for an extended period. So the chance of their damage also increases with increasing usage time. To keep running the deep cycle batteries and checking them out, it is essential to keep testing them so that you can get to know if any damage occurs in them earlier.
How to test a deep cycle battery with a multimeter?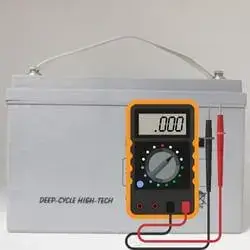
The important ones need more care; the same saying goes for deep-cycle batteries. As deep cycle batteries are important for all electrical appliances, they should be tested properly, but it is important to know the actual procedure for testing them.
Moreover, it is also essential to choose the right tool to test these deep-cycle batteries. Using a digital multimeter for this task can be a good choice for everyone because the multimeters can help you test the deep cycle batteries with a minimum material requirement, along with the best and trust-able results.
So you can use the digital multimeter, and by following the proper guidance, you can quickly test the deep cycle batteries of any of your appliances with the help of the digital multimeter.
Material required:
- Deep cycle battery
- Battery charger
- Digital Multimeter
- Protection gloves
Let’s read below quick steps guide overview before going to the detailed guide:
How to test a deep cycle battery with a multimeter (quick steps):
- Charge the deep cycle battery with the appropriate charger to its total capacity
- Use the battery for 5 to 10 minutes to stabilize the amount of voltage in the battery
- Turn on the digital multimeter
- Set the digital multimeter on the voltage settings by turning The selection knob of the digital multimeter toward the voltage option.
- Connect the leads of the digital multimeter with the terminals of the deep cycle battery.
- Take the readings of the voltage from the digital multimeter
- Take the voltage readings five times after specific intervals
- Calculate the average of all these 5 voltage values of the deep cycle battery
- If the results are equal to 12.4 volts for a 12-volt deep cycle battery and 6.2 volts for a 6-volt deep cycle battery, then it means that the battery is normal and working great
- Results with a significant difference from the normal readings will ensure that the battery has got damaged and you have to replace it with a new one.
Now let’s read below step-by-step guide to perform a test like a pro:
How to test a deep cycle battery with a multimeter (step-by-step guide):
Step 1: Charge the battery
While testing the deep cycle battery, charging it with an appropriate charger is vital. Do not use any ordinary charger. Use the suitable charger according to the kind of deep cycle battery. Please charge the battery with recharge until the deep cycle battery reaches its maximum storage voltage value. After charging the battery disconnect the charger.
Step 2: Utilize the battery
Before testing the deep cycle battery, you have to reduce the amount of voltage by a few volts because if you test the fully charged battery, it can damage the digital multimeter, and it is possible that the digital multimeter is not able to measure this large amount of voltage.
Stabilizing the battery by running it for 5 to 10 minutes is important to get the right results. After stabilizing it, the battery is ready to be tested by the digital multimeter.
Step 3: Turn on the digital multimeter
To test the deep cycle battery using the digital multimeter, you have to turn ON the digital multimeter by turning the selection dial of the digital multimeter towards the ON option. It will turn ON the digital multimeter, and then you can easily take any readings by using it.
Step 4: Set the digital multimeter
To use the digital multimeter to test the deep cycle battery, you have to set the digital multimeter at the voltage settings. You have to turn The selection dial towards the voltage option for this. By doing this, the digital multimeter will get set to test the deep cycle battery voltage.
Step 5: Connect the digital multimeter
In the next step, connect the digital multimeter to the deep-cycle battery. You have to connect the red lead of the digital multimeter with the positive terminal of the deep cycle battery and the black lead of the digital multimeter with the negative terminal of the deep cycle battery.
Make sure you make the right connections between the color of the wires and the type of terminals of the deep-cycle battery. If you do not make the proper connection, then the results you will get will not be appropriate and accurate.
Step 6: Take voltage readings
After connecting the digital multimeter with the deep cycle battery, you will now get the voltage readings of the deep cycle battery on the display screen of the digital multimeter. You have to know the first voltage reading, and after that, you have to take 4 more readings of the deep cycle battery voltage, each after specific intervals of time.
After taking the five readings of the same deep cycle battery voltage, you have to calculate the average of all these 5 values. The resulting value will be the final deep cycle battery voltage value, which you must compare with the normal one.
Step 7: Compare the readings
Now you have to compare the regular deep cycle voltage readings with the resulting values of the voltage.
If you get the result value of 12.4 volts for a 12 volts deep cycle battery, then it means that the battery is running great.
If you get the resulting value of 6.2 volts for a 6-volt deep cycle battery, then it means that the battery is working well.
The results far from the standard values mean that the battery is not good, and now you have to replace the deep cycle battery of your specific appliance with a new one.
Final verdict
Deep-cycle batteries are important for all appliances that run on a constant electricity supply. A problem can occur in the starting battery of the appliance also, but the chance for a deep cycle battery to get damaged is more than the starting battery.
This is because the deep cycle battery comes in more frequent use, so you should know how to check a deep cycle battery, and by using a digital multimeter, the task gets easier for even a non-specialist.
If you like to perform these small tests independently, you can do it by following the proper guideline and using the right tool, like a digital multimeter.
Related Guides:


