With this comprehensive guide, learn how to test a telephone wire using a multimeter. Discover the easy steps to determine if your telephone line is functioning properly and fix any issues.
Telephones are widely used electronic gadgets that are available in almost all homes. Issues in this type of necessity can cause great trouble in anyone’s life. Telephones can have problems in the central part, like telephone wires, for which you have to perform a test to check them out.
The reason why the wires are one of the delicate parts of the telephone is that these wires act as a connection between the home or office and the major telephone switching centers. Because of this, the wires are installed carefully so that any issue in them will lead to a problem and will cause trouble in one’s communication.
Types of telephone wires:
Although the four types of telephone wires differ according to color, these four wires are paired together to form a line. The black and yellow wire form a pair, and the second pair is Red and Green. The problem can occur in any of them, but the testing procedure is the same for all these wires.
The wires are checked when the telephone causes any trouble because the wires are so delicate and tiny, so the chance of damage increases.
General inspection of telephone wiring:
Suppose your telephone is making communication difficult for you before moving towards the effective testing procedure of the telephone wire by using a multimeter. In that case, you can go for the general inspection first. This general inspection will work for you, and your telephone will start working correctly.
- Look at any unnecessary wire in the phone, Jack. If you find any, then remove it. Jack, only the major phone service cable should remain attached to the phone.
- Look at all four wires of the telephone. These wires should be in pairs; no pair can touch the other. If they touch each other, it might cause problems in the signal transmission of the telephone.
- All the wire connections of the phone Jack should be in their proper positions. You must perform the proper testing procedure below if any wire is missing.
How to test a telephone wire with a multimeter?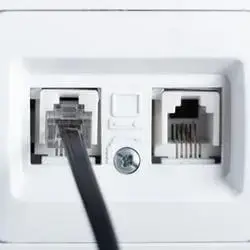
The problem with adequately functioning telephone wires is when the two lines get in touch. If an excellent independent circuit is present for both these lines, no problem will occur.
You can use the digital multimeter to test this problem in the telephone wires.
Tools required:
- Digital Multimeter
- Screwdriver
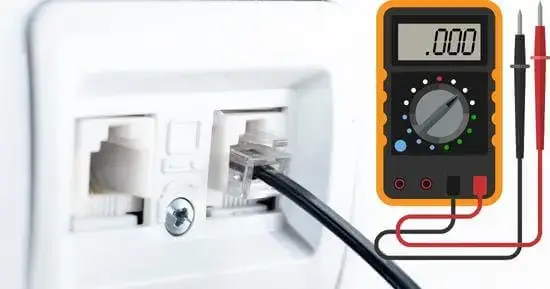
Here are quick steps to test a telephone wire with a multimeter
- First, you must disconnect all the connections with the telephone Jack and open the telephone lines for the proper inspection.
- Find the NID of your phone service.
- Use the screwdriver and only uncover the screws which got labeled customer access.
- To open the phone lines, you have to disconnect them from their respective test jacks.
- Do not touch the wires immediately; wait for one or two minutes and then proceed with the test.
- Meanwhile, set the digital multimeter at the continuity setting.
- Now connect the leads of the digital multimeter with the phone wires.
- Suppose any continuity reading appears on the screen of the digital multimeter. In that case, the phone wires are touching each other, and if no continuity readings appear, your phone wires are working well.
- Repeat the same test for the other pair of wires to detect the problem.
Read below the step-by-step guide for testing a telephone wire with a multimeter.
Step 1: Disconnect the telephone, Jack
To start the test, you first have to disconnect the telephone Jack in connection with any other things. It means that for the proper testing, you should have all the wires open in front of you, and for this, disconnection of the telephone Jack is the most important step.
Step 2: Find the NID of the phone service
The second step of this procedure is to find the NID of your phone service. NID is the network interface device box which should be located close to your house. This is the box which connects the phone service of your house with the main telephone company. Call the main service center for help if you are still looking for it. After finding it, moves toward the next step.
Step 3: Uncover the customer’s access cover
Now, this is the most important step of this procedure. In this step, you have to take the screwdriver and look for the screws labeled customer access. You have to unscrew them without any negligence, do not unscrew any other except the customer access ones.
Step 4: Disconnect the phone wires
To test the phone wires, you have to disconnect them from their respective NID test jacks. After disconnecting them, you will reach the final step of this procedure, where you have all the wires open right in front of you, and you can inspect each pair one by one quickly.
Step 5: Set the digital multimeter
After disconnecting the phone wires, you have to wait for 1 minute, and meanwhile, you can set the digital multimeter at the continuity settings to test the phone wires. Turn the selection dial of the digital multimeter towards the continuity symbol, and now the return multimeter is all set to perform the test.
It would be best if you did not touch the wires right after opening the connection; otherwise, you can experience an electric shock, so you are advised to wait for a few minutes until all the current from these wires can be drawn back.
Step 6: Connect the multimeter leads with wires
Now you have to connect the multimeter’s leads with the wires of the first pair. Connect both the leads of the multimeter with both the wires of the pair and look for the readings of continuity on the screen of the digital multimeter.
Step 7: Check the results
Now you have to check the results from the display screen of the digital multimeter. If the multimeter shows any continuity readings, then it means that the wires are in connection with each other and not performing well. If no continuity reading appears on the screen, then it means that both the wires of a line are at their proper place and have no unusual connections with any other wires.
Step 8: Repeat the test
Repeat the same test for the other pair of wires and look for the problem. After repeating the test, you will conclude which pair of wires has trouble.
Final verdict
Telephone wires have their respective decided connections, which should not be disturbed at any cost. If they get disturbed, they will cause problems for you while using the telephone and create discomfort in your communication. If you face distortion in the signals and cannot listen to the other person, then the telephone wires are causing resistance.
So for this, the test performed using the digital multimeter can be the best choice and will help you find out the problem’s main location, making it easier for you to find the right solution to this problem.
Related Guides:


