Washing machine motor problems can be frustrating, but they can be easily diagnosed with the right tools. This guide will show you how to use a multimeter to test your washing machine motor and ensure it functions properly.
Motors are like the heart of washing machines. The central part of the washing machine is the motor that helps it run and perform well. There are numerous varieties of washing machines, with different prices and lasting warranties.
The washing machine cannot run if its motor gets damaged, but this incident does not often occur because all the hard work is done on the motors while designing the washing machines to give them lasting quality.
But there are still some conditions in which the motors of the washing machines can get damaged. The point which should not be neglected here is that whenever you see your washing machine making unusual sounds, getting tripped repeatedly, getting hot unusually, and not running correctly, you should first check the machine motor.
Using a digital multimeter will help you to perform this task well.
Reasons that can damage the washing machine motor
Here is a list of some events and reasons that can damage your washing machine’s motor. This include
- The bad agitator
- Overload washer
- Accumulation of dust
- Worn out bearings
- Wiring issues
- Short circuit
- Uneven electricity supply
- Loosening of drum
These issues can damage the washing machine motor badly, so ensure that you avoid these conditions from happening with your washing machine.
How to test a washing machine motor with a multimeter?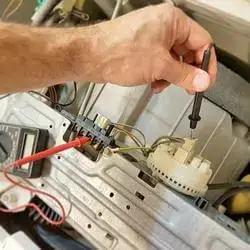
To test the washing machine’s motor, you should have all the necessary equipment. The equipment which you will need is the following:
- Screwdriver
- Digital Multimeter
- Protective gloves
After arranging these essentials now, you can move toward the final testing procedure of the motor.
You can perform two tests to check your washing machine’s motor thoroughly.
Test # 1: Check the resistance of the motor
Before going to step by step guide, here are some quick steps to overview:
- In the first step, you have to turn off the electricity supply to the motor.
- Open the rear panel of the washing machine by using the screwdriver to access the motor directly.
- Disconnect both the leads of the motor
- Set the multimeter at the resistance settings
- Connect both the probes of the multimeter with the terminals of the motor
- Take the readings of resistance
- Zero or close distance to zero resistance means the motor functions correctly; any higher or infinite resistance value means the motor is faulty.
Let’s read the step-by-step guide below to test a washing machine motor with a multimeter:
Step 1: Disconnect the power supply
The first step of this testing procedure is to unplug any power supply to the motor so that you can inspect it properly without fearing any electric shock. Moreover, you cannot access the internal parts of the washing machine until it has running electricity. In that case, proceeding with the test will be very dangerous, so disconnect the power supply to your washing machine.
Step 2: Access the motor directly
The next step of this procedure is to access the motor directly. It means you have to open the rear panel of the washing machine where the motor is located in most of the washing machines. You can use the screwdriver to unscrew the nuts of the panel, and after this, you will access your washing machine’s motor directly, from which you can proceed toward the next step.
Tip: If you need to know where your washing machine’s motor is located, then you can check the manual card given by the company that comes with the washing machine; it will help you find the exact location of the motor.
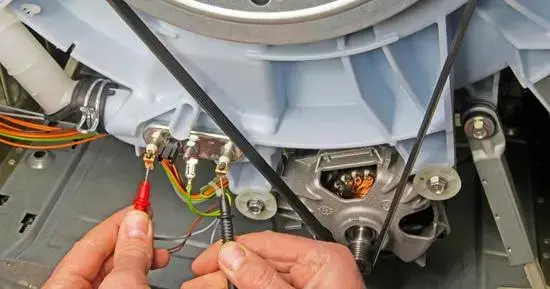
Step 3: Disconnect the leads of the motor
You must first disconnect the motor’s leads to connect the washing machine motor to the multimeter. So wear protective gloves and remove both the motor wires from the terminals.
Step 4: Set the digital multimeter
To check the resistance of your washing machine’s motor, you have to set the digital multimeter to the resistance settings. So for this, you have to turn the selection knob of your digital multimeter towards the resistance settings and select the lowest reading to test your washing machine’s motor.
Step 5: Connect the multimeter to the motor
To connect the digital multimeter and the washing machine motor, you have to connect the digital multimeter’s leads with the motor’s terminals and connect the leads with the terminals one by one.
Step 6: Take the readings of resistance
After connecting the probes of the multimeter with the terminals of the motor, you will get the resistance readings on the digital screen of the multimeter.
- If the resulting readings come to zero or close to zero, then it means that the washing machine’s motor is working correctly and there is no fault in it.
- If the resulting readings are higher or infinite, then it means that the motor is the real culprit.
Test # 2: Test the capacitor of the washing machine motor
After testing the resistance of your washing machine’s motor, you can also perform the second test of checking the motor’s capacitor. It will help you find the exact problem causing trouble in using your washing machine.
Before going to step by step guide, here are some quick steps to overview:
- Disconnect electricity supplied to the motor
- Uncover the metal cover of the start capacitor of your motor.
- Unplug both the wires from the terminals
- Set the digital multimeter at the ohm settings
- Touch the probes of the multimeter with the terminals of the capacitor
- A healthy washing machine motor will show a zero resistance value.
Let’s read the step-by-step guide below to test a washing machine motor with a multimeter:
Step 1: Turn the power supply off
First, you have to turn the power supply off to the motor so you can perform the test efficiently.
Step 2: Uncover the metal cover
Now you have to use the screwdriver and uncover the metal cover of the motor’s start capacitor. It is necessary because you have to check the resistance of the capacitor of your motor this time.
Step 3: Disconnect the wires from the terminals
Disconnecting the wires from the terminals of the washing machine motor capacitor makes it free to connect the digital multimeter probes with it, which will help you find the capacitors’ resistance.
Step 4: Set the digital multimeter
As of now, you have to test the resistance of the motor capacitor, so you have to set the digital multimeter on the ohms settings. Turn the selection knob of the digital multimeter towards the ohms settings to proceed with the test.
Step 5: Touch the multimeter probes with terminals
There are two probes of a digital multimeter. The red and black ones.
First, you have to touch the black probe of the multimeter with the right terminal and the red probe of the multimeter with the left terminal. At this point, check the needle of the digital multimeter.
If the needle moves towards the right and then again goes back to zero, then there is no problem with the motor capacitors, and if it does not do so and does not show any moment, then it means that the capacitors are damaged.
Now you have to reverse the settings of the multimeter’s probes by connecting the black to the left terminal and the red probe to the right terminal again to see the needle movement of the digital multimeter.
If the needle shows the same movement, then it means that the capacitors are going well, but if it does not show the moment, then the problem is in the capacitors of your washing machine motor.
After performing both these tests, you will be able to know what is the actual reason which is damaging your washing machine so you will be able to make the right decision for your washing machine. For further deep check, you can call the professionals for it.
If the capacitors are causing the trouble, then you can change the capacitors, but if the problem is in the motor, then, unfortunately, you have to replace the motor with the new one, which is a little expensive step to take.
Final verdict
Most washing machines have excellent motors that do not cause much trouble for you, and the issues with them get resolved by cleaning some accumulated dirt in the pipes and the motor.
But if the problem is not resolved after doing this, you can test your washing machine’s motor using the above-explained tests.
An analog multimeter will help you to find out the resistance of your motor and its capacitors, by which it will be easy to find out for you the exact part of your washing machine which is the main culprit.
Related Guides:


