Parking sensors are an excellent innovation in cars. Parking sensors must be installed correctly and in good condition; otherwise, you may hit your vehicle while parking. You can test a parking sensor with a multimeter by measuring the voltage and resistance of the sensor wires and terminals.
There are two types of parking sensors, ultrasonic and electromagnetic.
Ultrasonic sensors emit ultrasonic waves and estimate the distance from an obstacle through radiation. While electromagnetic sensors generate electromagnetic waves, they are more advance and costly.
Testing parking sensors seem difficult if you’re unsure what to do or where to start.
This post will teach you how to test parking sensors with a multimeter.
How to test parking sensors with a multimeter
Quick steps to test parking aid sensor
- Remove the sensor from the car.
- Set your multimeter to resistance.
- Connect the black probe to the ground terminal(top/center) and the red probe to the live terminal(right).
- A fine car parking sensor will have around 10k ohm.
- Also, test the voltage of wires in the sensor connector.
- Live and ground wires should have around 12V.
Below we’ve discussed step by step guide.
Step 1: Locate and remove the sensor
First, we’ll test the voltage of the parking sensor connector. For this, we’ll have to remove the parking sensor from its connector behind the bumper.
Locate your parking sensor connector. It should be behind the front and rear bumper. In some cases, it may be located under the floor mat if previous owners have relocated it. The location of this connector will vary depending on the make and model of the car.
The bumper should be easy to remove. If you have an older car, that case, you may need to use a flathead screwdriver to pry it off.
Once the bumper is released, you’ll see a black box attached near where your headlights are housed. This is where all of your parking sensor wirings is located. Now remove the sensor from the plug (connector).
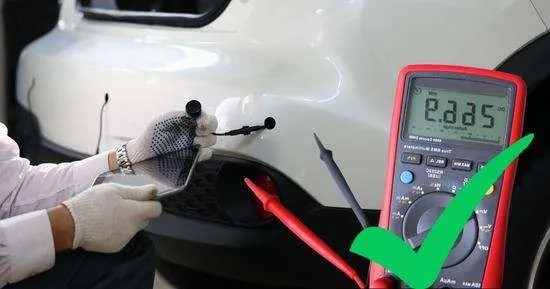
Sensors have three terminals: ground(top), live(right), and signal(left). A connector connects these terminals to their corresponding wires.
Now compare the structure of the parking sensor connector with the terminals of sensors and identify the live, ground, and signal wire inside the connector.
Tip: To locate a faulty sensor without using a tool, turn on your vehicle and get closer to the parking sensor. Touch/slightly press the sensor with your finger. If a sensor is fine, it’ll detect the finder and starts making a clicking(ticking/arcing) sound. In this way, check all parking sensors, and one that’s not clicking could be faulty.
Step 2: Test Voltage of parking sensor
Now set your multimeter to DC voltage, as the car battery supplies direct current. Select the range above the battery voltage, such as 20V.
Connect the black probe to the ground wire(top or center) and the red probe to the live wire(right) in the sensor connector(harness).
You should also test the ground wire of the sensor connector to check if the current is leaking through the ground wire.
Connect the red probe to the positive terminal of the car’s battery and the black probe to the ground wire in the sensor connector.
Step 3: Evaluate the parking sensor voltage
This way, the multimeter will tell you the voltage parking sensor is getting through the battery. If the battery is fully charged and the car sensor wiring is OK, your multimeter must read the voltage equivalent to the battery, such as 12.6V.
If the sensor’s power wire is broken, a multimeter will display OL, which means an open loop (broken wires).
The voltage reading on the multimeter will drop If the ground wire leaks(damaged).
In a good-condition ground wire, the multimeter will display the exact voltage of the battery because no current is escaping.
Step 4: Test resistance of parking sensor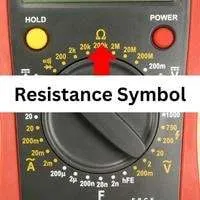
Now we’ll test the resistance of the parking sensor. Resistance measurement will help you evaluate the condition of the internal wiring in the car parking sensor.
Set your multimeter to ohms (Ω). Connect one probe to the ground terminal(top) and the other to the sensor’s live terminal(left). You can attach probes in any direction because resistance is non-directional.
Using alligator clips to attach the multimeter to the sensor’s terminals is good.
Make sure that probes don’t contact each other while testing the sensor. It can result in inaccurate measurements.
Evaluate the parking sensor resistance
Most parking sensors can have a resistance of about 10K ohms. However, it would help to compare your parking sensor’s resistance with the manual’s ideal range.
If the multimeter reading is below the ideal range, your sensor is faulty and should be replaced.
How to clean parking sensors?
Over time parking sensors get clogged and work improperly due to dust, rust and grime. Cleaning a parking sensor is relatively easy with some valuable materials such as microfiber cloth, WD 40 (rust protective lubricant) and isopropyl(rubbing alcohol) and cleaning swabs.
First, use the microfiber cloth to clean visible dirt on the parking sensor. Use WD 40 to clean hard rust stains and let them lose the dust and rust layers, then wipe all the dust thoroughly.
To clean the sensor body, soak a cotton swab with rubbing alcohol and clean the sensor thoroughly(gaps). At last dry the sensor with a clean microfiber cloth.
Conclusion
Parking sensors are a great way to ensure you don’t hit anything when parking. They emit an audible tone based on the distance between your bumper and an object.
If you’re having trouble with your parking sensor, it’s best to check resistance and voltage in parking sensor terminals and wires with a multimeter. It is the best way of saving time and money by preventing unnecessary repairs.
Hopefully, you’ve learned how to test parking sensors with a multimeter. Share your opinions and experience in the comments.
Related Guides:


