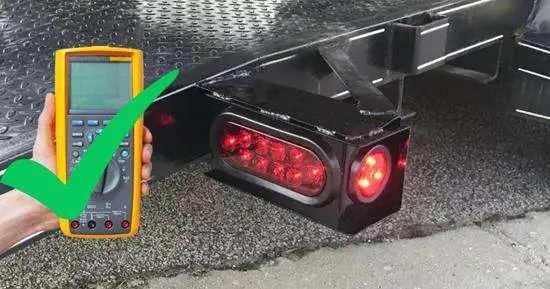
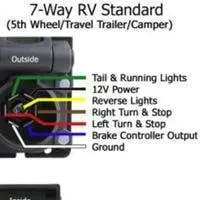
This post will discuss how to test trailer lights with a multimeter. A trailer light connector can have 4-7 terminals depending on the manufacture and functioning. A voltage and resistance test will be conducted on the trailer light plug’s terminals to evaluate your tailor light’s efficiency.
Let’s understand in detail for step-by-step testing your trailer lights.
How to test trailer lights with a multimeter
To check trailer lights:
- Identify terminals of the trailer light’s connector.
- Measure resistance in the ground terminal in the connector and grounding point in the vehicle.
- Measure resistance in the ground terminal and other terminals in the connector
- When the specific terminal light is on, measure the voltage in the negative and positive terminals.
Test 1: Test resistance in trailer light connector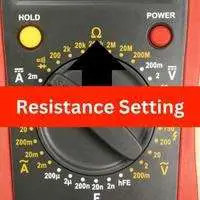
First, you must test resistance in your car’s negative pin of trailer brakes and a ground connection.
For this, set your multimeter to ohms. Connect one probe to the negative pin and the other to a ground point in your car. You can connect probes in any direction, as resistance has no direction.
The multimeter should read around 0-.3 ohms in the negative pin and your car’s ground.
The circuit is damaged if the multimeter reads above the ideal reading.
Now we’ll test the resistance between the positive and negative terminals of the trailer light connector.
Set your multimeter to resistance. Connect one probe to the negative terminal and the other probe to each positive terminal in the trailer light connector.
Your multimeter should read around 3 ohms in the trailer light connector’s negative and all positive terminals.
Test 2: Test voltage in trailer light connector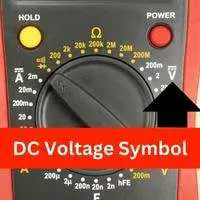
We’ll also test the voltage of the trailer brake lights. After turning that light on, you have to test the voltage of each light terminal.
- For testing voltage, set your multimeter to DC voltage.
- Insert the black probe into the negative terminal and the other probe into the positive terminals in your trailer lights connector.
- After the probe connection, turn on the light of that specific terminal, such as the rear or front.
- When the light is glowing, your trailer light connector should receive maximum voltage from the battery at that specific terminal. If your vehicle’s battery is 12 volts, the multimeter should read 12-12.6V in each positive terminal when the light is on.
- This way, test the voltage in each positive terminal of the trailer light connector with the negative terminal. Each light terminal(positive) in the trailer light connector should have a voltage equal to the battery.
Frequently Asked Questions
-
How to test 7 pin trailer plug with a multimeter?
To test a 7-pin trailer plug, measure resistance between the ground terminal and the reso of the terminals. Your multimeter should read around 3 ohms. Compare the multimeter reading with the ideal range.
-
How to check the ground on trailer wiring?
Trace the ground wire you want to test. Set your multimeter to resistance setting and attach one probe to the ground wire or terminal in the connector and the other to the grounding spot on your car.
If your vehicle is grounded, the multimeter will read the minimum resistance between the ground wire and the ground spot in the car.
-
How to test trailer lights without a vehicle?
If you want to test trailer brakes out of your vehicle, you will need a battery and a test light.
Connect the ground wire of the light to the negative battery terminal. Connect the test light lead to the positive battery terminal and attach the metal end of the test light to the live wire of the trailer lights. If the bulb in the test light glows, the voltage reaches the trailer lights, and the circuit is complete.
-
How to test 4 pin trailer plug with a multimeter?
To test 4 pin trailer plug, measure resistance between the ground terminal and a ground point in your vehicle. The multimeter should read 0-.3 ohm resistance.
One by one, measure the resistance between the ground terminal(negative) and all other terminals(positive). Each terminal should have around 3 ohms with the ground terminal.
-
How to find a short in trailer lights?
Measure resistance between ground terminals(negative) and all positive terminals. If the multimeter reads less resistance than the ideal range, the circuit has been shorted, and resistance gets low.
Conclusion
Testing a trailer light is quite an easy task. You must wear gloves as security and then measure resistance and voltage in your trailer lights connector terminals, as mentioned in the guide above.
Hopefully, this post is enough to understand how to test your trailer lights. If you still have any queries, ask down in the comment.
Related Guides:


