To charge a capacitor, you need a resistor, but what if you don’t have one? Don’t worry, and there are ways to get around that! This article will tell you how to make a capacitor charger, also known as a capacitor circuit. Stay tuned for more valuable tips and tricks!
A charged capacitor is dangerous as it can discharge its full power quickly (in seconds).
Let’s understand some basics first…
What is a capacitor, and what is its role?
A capacitor is a device that stores electrical energy in an electric field. It comprises two conductors(usually metal plates) separated by an insulating material called a dielectric. When a voltage is given to a capacitor, the electric field stores energy in the form of an electric potential difference between the two plates.
The capacitor plays a vital role in many electronic circuits. For example, it is used in the power supply to smooth out the output of a rectifier. It is also used in filters to remove unwanted frequencies from a signal.
Additionally, capacitors are used in timing circuits to control the duration of electrical signals. It is crucial in many electronic devices, such as radios, televisions, and computers. It is also used in electric power systems to smooth out voltage fluctuations.
How to charge a capacitor without a resistor?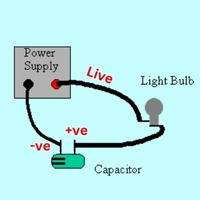
It’s a common question asked by many “how can we charge a capacitor without using a resistor?” The answer is quite simple. All you need is a power source, a bulb, and a capacitor.
First, understand how a capacitor is charged and discharged. You can use any appliance that consumes voltage and has some resistance, such as a bulb.
To make a capacitor charging circuit, connect the battery, load(bulb), and capacitor in a series circuit.
A bulb connected to a circuit consumes energy to glow. Hence the bulb makes the current flow in the whole circuit. When current from the battery flowing through the bulb reaches the plates of capacitors, they get charged. This way, a capacitor charging circuit will work as a capacitor charger.
If the battery is removed from the circuit, the capacitor will discharge itself to light the bulb. When the power supply is interrupted, a capacitor is placed in a circuit behind the battery to supply its stored energy.
Let’s Follow the Step-by-step guide
Step 1: Precautions
There are a few things you can do to prevent accidents while charging your capacitor:
- Wear Gloves.
- Make sure the area around the capacitor is well–ventilated and dry.
- Keep the capacitor away from flammable materials.
- Ensure the power source you’re using is compatible (not too high or low voltage) with the capacitor.
- Use a resistor to limit the current flow and prevent damage to the capacitor.
- Be sure to discharge the capacitor before removing it from the circuit.
Step 2: Things Required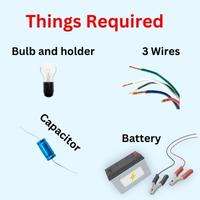
To make a capacitor charging circuit, you’ll need a few cheap electric items such as:
- A battery (power source)
- A bulb (Two for higher capacitors)
- Three pieces of wires
- A capacitor to charge.
Step 3: Make a Simple Series Circuit
A bulb is necessary to make a capacitor charger because you should have a component (load) that has some resistance, consumes voltage, and make the current flow in the circuit. A bulb also acts as a resistor by consuming and engaging current voltage to prevent your capacitor from direct current supply.
- Connect wires in such a way that connects the positive battery terminal (live wire) to one wire (terminal)
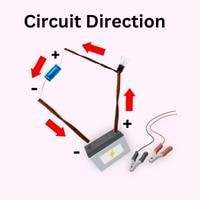
of the bulb socket. Connect the negative battery terminal (ground) to the negative terminal of the capacitor.
- Now you have a battery bulb and capacitor in series. Now turn on the power supply and connect the second wire of the bulb socket with the +ve terminal of the capacitor.
- When the circuit is complete, current will flow from the battery’s live wire to the bulb, then to the capacitor, and back to the battery through the negative terminal.
Tips:
- You can use an alligator clip for connection.
- To identify the -ve or +ve capacitor terminal, check the signs on the terminals. In some capacitors, a short leg(pin) is -ve, and a large leg is the positive terminal of the capacitor.
Step 4: How to know if the capacitor is charged
The bulb will glow, and the capacitor will start charging. As the capacitor gets charged, your bulb will dim; at the end, it’ll be completely dark, indicating that the capacitor is fully charged.
The maximum time a capacitor takes to reach its full charge will depend on the amount of energy supplied by the power source.
Once your capacitor is fully charged, it can hold this charge for some time(minutes, hours, days). The amount of time the capacitor can hold its charge will depend on its size and type.
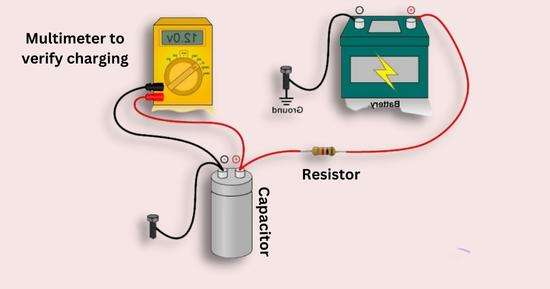
To calculate a capacitor’s charging time, use a multimeter to measure the DC voltage of the capacitor while charging it in a bulb circuit. When a capacitor charges, the multimeter will increase the voltage in both capacitor terminals. When the capacitor is fully charged voltage reading on the multimeter will get stable. This is how you can calculate the capacitor charging time.
On the other hand, connect the bulb socket’s wires to the capacitor’s terminals to discharge a capacitor. The bulb will glow and goes dark after the capacitor is discharged.
Why do you need to charge a capacitor without a resistor?
- One application where you might need to charge a capacitor without using a resistor is in a direct current (DC) circuit. In this type of circuit, the capacitor can act as an energy storage device, providing a current when needed and then recharging itself from the DC power source.
- Another application where you might need to charge a capacitor without a resistor is an alternating current (AC) circuit. In this type of circuit, the capacitor can act as a filter, smoothing out the AC power so that DC devices can use it.
- Remember: Never charge a capacitor with a direct power source (especially AC). Because there is no resistance and consumption in the circuit, direct high voltage can burn the capacitor.
Potential dangers of charging a capacitor without a resistor
Charging a capacitor without a resistor can be dangerous if you’re not careful. Here are four potential dangers to watch out for:
- Overcharging the capacitor can cause it to explode and is hazardous to you and anyone nearby.
- Discharging the capacitor into something that can’t handle the electrical current
- A short circuit can cause an electrical current to flow through your body, which can be dangerous or even fatal.
- Connecting the capacitor to the wrong voltage can damage it and any equipment it’s connected to. For example, it is charging a capacitor with a direct AC source.
So, be careful when charging a capacitor without a resistor. These dangers should be taken into account to ensure your safety and the safety of those around you.
Frequently Asked Questions
-
How to charge a capacitor with AC?
An AC is known for changing its direction. When the direction of current changes in an AC circuit, its voltage also increases or decreases. Due to continuously changing voltage, capacitors’ plates constantly charge and discharge themselves.
Also, charging a capacitor with an AC power supply is not recommended. AC power supply has 120 or 240 volts, enough to burn a small capacitor (such as 50 volts) in a few seconds due to overcharging and overheating.
-
How to charge a capacitor with a multimeter?
A multimeter doesn’t charge or discharge a capacitor. Instead, it verifies whether a capacitor is set by measuring the voltage.
To know if a capacitor is charged or not, use a multimeter and measure the DC volts of the capacitor. If the multimeter reads around zero voltage, it is not charged (discharged). If the multimeter reads high voltage, your capacitor is charged. You can check the max voltage on the capacitor body or manual.
To know if a capacitor is suitable, measure the resistance between terminals of capacitors with a multimeter. A good capacitor will show around zero resistance at the start and continuously increase.
-
How to charge a capacitor with a battery?
To charge a capacitor with a battery, you should have a resistor or any device that acts as a resistor (resists and consumes power). Connect the battery, capacitor, and bulb (or resistor) in series.
After completing the circuit, your bulb will glow, indicating that current is flowing in the circuit and is charging the capacitor. In a DC supply, voltage is constant, so capacitors stay charged.
-
How to charge a car audio capacitor?
To make a capacitor charger for a car audio capacitor, make a circuit with a battery, resistor, or bulb and a capacitor to charge. Connect everything in series by joining the live battery lead(+ve) to the resistor. The negative battery(-ve) lead goes to the negative capacitor terminal.
Now connect the free end of the resistor to the positive capacitor terminal. This way, the current will move from the battery to the bulb and then to the capacitor.
You can also use a bulb instead of a resistor to charge a capacitor. You have to install a bulb in place of a resistor. Follow the complete guide above to charge a capacitor with a bulb.
Conclusion
So without a resistor, anything that works similarly can charge a capacitor. But you might not like the consequences. If you want to provide or get extra voltage out of your capacitors, try using simple techniques to charge a capacitor with a resistor. Be sure to keep an eye on things because things can quickly go from bad to worse.
Have you ever tried charging a capacitor without a resistor? What was the outcome? Let us know in the comments below!
Related Guides:


