
A wiring harness is a set of connectors, wires, and terminals that connects different components of your vehicle in a circuit and share data and electrical signals to the ECU through wires. When a faulty harness cable or connector is found, you should check the wiring with the multimeter to prevent further loss.
Testing a wire harness can be difficult for beginners, as you must identify wires from a bunch before testing. We’ll teach you how to test wiring harness cables and connectors with a multimeter.
How to check wiring harness with multimeter
For testing wiring harness with multimeter
- First, identify a wire to test from both ends of the harness connectors.
- Set your multimeter to ohms and test resistance in the terminal.
- After resistance, set the multimeter to DC voltage and check the voltage of the wiring harness circuit.
- Compare all multimeter readings with the ideal range in the manual.
- The ideal Resistance range is 0-1 ohms, and the voltage is 12 V
If any component of the wiring harness fails the multimeter test, you should repair or replace the harness for better performance of your vehicle.
Follow the step-by-step guide below for testing the wiring harness with a multimeter.
Step 1: Identify wires to test
- First, you must trace wires and terminals from both ends of a plug(connectors) you want to test.
- Check the car manual for ease in identifying terminals.
- Check the wiring harness terminals and connectors for corrosion and sulfur deposits.
- Look closely for broken wires or damaged insulation at joints.
Step 2: Testing resistance of the wiring harness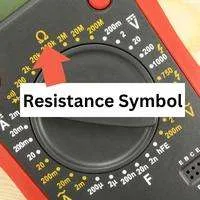
By testing resistance, we can identify if any terminal or wire in the harness is damaged and causing high or low resistances in the circuit. High or low resistance (the force that opposes current) can affect the current flow, thus the functioning of the component.
To test resistance, set your multimeter to ohms.
Connect the multimeter probes at both ends of any component or wire you want to test.
You can place probes in any sequence, as resistance is non-directional.
If your multimeter reads OL (open loop), the tested component has no continuity (broken circuit).
Your multimeter must read below 1 ohm if the tested component is fine. Most harnesses in cars have a resistance below one ohm.
Let’s move on to Testing continuity!
Step 3: Testing continuity of the wiring harness
By testing continuity in the harness, you’ll come to know if any of the components of the wiring harness is damaged. Continuity is the measure of flow in a conductor or circuit.
Set your multimeter to continuity mode (diode symbol) to test continuity in your vehicle harness.
Connect black and red multimeter probes at both ends of the harness you want to test.
If your multimeter beeps or shows continuity, the tested components have a complete path.
If your multimeter displays OL(open loop), there is no continuity in the tested points due to a broken wire or component.
Step 4: Testing Voltage of the wiring harness
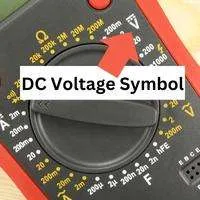
Checking the voltage of the wiring harness is necessary to know if the circuit is getting enough voltage. This will help you identify any shorted or leaked components.
It is possible to test whether any component in your wiring harness receives enough voltage by connecting it to the battery or engine.
First, inspect the terminal or wire in the harness you want to test.
Now set your multimeter to measure DC voltage (as the battery supplies DC).
Connect the black probe of the multimeter to any ground point in the car or negative battery terminal.
Connect the red probe to the live wire of the component you are testing.
The multimeter must read 12V in each terminal if your wiring harness is fine.
There is current leakage due to damage in the circuit.
If the multimeter reads OL(open loop), the component is not getting voltage due to discontinuity.
Signs Of Bad Wiring Harness
If any component of your car engine is not efficiently working, you can check the wiring harness to detect the cause of the malfunction.
Inspect damage in wires, going to the connectors. Damaged insulation, blown components (plugs), corrosion, and sulfur can complicate current flow.
If your battery discharges earlier, it’s also a sign of a bad wiring harness, as the damaged wires or components drain more voltage and leak.
For example, a damaged harness wire or plugs of an O2 sensor will affect engine timing and output.
Conclusion
A wiring harness is the most unnoticed component in a vehicle. The next time your vehicle experiences an undetectable failure, check the continuity, resistance, and voltage wiring harness.
It’s necessary to check your vehicle’s wiring harness, as any damage or breakdown can result in poor performance. Wire harnesses develop a secure connection between two or more components using a series of wires in one bundle.
It’s also helpful to inspect for damaged insulations visually. But most importantly, you must identify wires at both ends of a wire you want to test.
Related Guides:


