If your car engine is not starting and the spark plug is OK, then the crank sensor could be a reason for poor ignition. You can test a crank censor in various ways, such as with a multimeter, scanner, or bench test. But in this post, you’ll learn how to test a 3-wire crank sensor with a multimeter.
The engine control unit uses a crank sensor to detect the position and rotation of the crankshaft, pistons, and valves. We have to check the voltage of the crank sensor connector wires and the sensor’s resistance.
Here’s how you can test a 3-wire crank sensor with a multimeter.
How to test 3 wire crank sensor with a multimeter
- Disconnect the wires from the crank sensor plug.
- Set your multimeter to DC voltage.
- Measure voltage from the ground terminal to signal and live terminal of the sensor plug.
- Also, measure resistance between terminals of the crank sensor plug.
- Check readings on the multimeter against ideal ranges in manuals.
Follow the step-by-step guide to test the crank sensor with a multimeter.
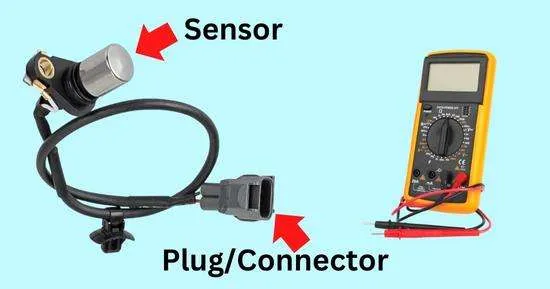
Step 1: Locate the sensor
To test a crankshaft sensor, we have to locate it first. You may have to remove the tire.
The crank sensor is located on the front or back of the teeth of the crankshaft. A crank sensor can also be located between the engine block and the transmission. However, vehicles may have differently installed crank sensors.
As the name suggests, three wire crank sensors have three wires signal, power, and ground. You must test these three wires using a multimeter to check your crank sensor.
- A power wire is a live wire that supplies battery current.
- The Signal wire is to share data (sensor readings) with the Engine control unit.
- Ground wires complete the circuit in each component of a car.
Check your car or crank sensor manual to identify wires on the plug.
Step 2: Test the voltage in the power & ground Terminal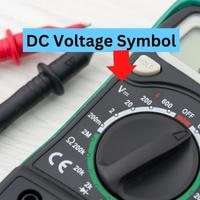
After identifying the wires, we have to test whether the wires and circuit in the crank sensor are fine.
- Turn on the ignition key.
- Set your multimeter to DC voltage.
- Connect the red probe to the live (power) and the black probe to the ground wire.
- The multimeter should read between 5-12 voltage (maximum for a good sensor).
- If the multimeter reads changing voltage, crank sensor wires are damaged.
- If the multimeter reads OL, it indicates broken wires in the sensor.
You should also check if the ground wire is fine or not. If the ground wire is faulty, it’ll leak the current.
To test the ground wire, connect the red probe to the battery-positive terminal and the black probe to the ground wire of your sensor.
If the crank sensor’s ground wire (connection) is fine (not leaking), the multimeter will display the voltage of your car battery, such as 12.6 V.
Step 3: Test Voltage in signal and ground Terminal:
- Start the engine (crank) and connect the red probe to the signal wire and the black probe to the ground wire.
- Wait for the multimeter reading. The multimeter should read around 5 volts.
- If the multimeter reads 0 voltage, then there is an incomplete(broken) circuit.
- Verify the voltage reading on the multimeter against the crank sensor’s ideal voltage range on the manual.
Some advanced multimeters will give average voltage readings of both instances (while the engine is off and on), such as 0-5 V as 2.5 V
Step 4: Test the resistance of the crank sensor
Resistance measurement will help determine if your crank sensor has any fault, such as damage or incomplete circuit, and resistance higher or lower than the normal range. High resistance in the crank sensor will make current difficult (resists) to pass in the circuit.
To measure resistance, we’ve to remove the crank sensor from the vehicle
- Select the multimeter’s resistance or ohm (Ω)setting to measure resistance.
- Connect black and red multimeter probes to the input terminals of the crank sensor.
- A three-wire crank sensor’s ideal resistance range is below 1000 ohms.
- While the probes are connected to the sensor, take metal and pass it near the sensor.
- The multimeter voltage will increase and return to normal when you take the metal away from the sensor.
- Voltage spikes indicate that your sensor is fine and detecting movements.
Frequently Asked Questions
How to bypass the crank position sensor?
If your engine is good to go without a crank sensor, you can run a vehicle without it. However, it’s not recommended by professionals to bypass a crank sensor. Without a crank sensor, ECU will be unable to monitor crankshaft rotation and position, resulting in poor ignition, spark, and milage and causing several other complications.
How to test 2 wire crank sensor with a multimeter?
To test a two-wire crank sensor, turn on the ignition key (not the engine).
Set your multimeter to DC voltage and connect the black probe to a ground point or negative battery terminal.
Connect the red probe to the sensor wires in the connector.
Ideally, a multimeter should read 10-12 V in the power wire while the engine is on.
The multimeter will read 0V (when only the key is on) and 5V (starting the engine) if the crank sensor circuit is designed for 5 volts.
How to start a car with a bad crankshaft sensor?
To start a car with a bad crank sensor, first, you must test the voltage of the sensor while it’s mounted in the vehicle because your vehicle won’t work with an expired crankshaft sensor.
Test the voltage of the sensor connector (plug) with the multimeter, which should be around 12 volts.
Check resistance by removing the sensor from the engine, which should be around 6-7 ohms. If the multimeter reads OL, your crank sensor’s circuit is broken.
If your sensor is fine, clean the dirt from the sensor. Apply some lubricant on the terminal for a smooth connection. Plug it back into the vehicle and try to start the engine.
How to test the crank sensor with a scanner?
To test a crank sensor with a scanner, turn on the scanner and set it to read Engine RPM. Now try to start the engine (crank). The sensor seems to be fine if the scanner reads between 100 and 500 rpm. Otherwise, too low or high readings indicate a faulty crank sensor, and no reading indicates an expired sensor.
Conclusion
Whether the problem is in the ground, signal, or voltage, the entire device will need to be replaced, and this process can be very tiresome. Follow the step-by-step guide above to test the 3-wire crank sensor with a multimeter.
Related Guides:


