Many people have used a digital multimeter as it has so many amazing uses in the world of electricity. There are many different types of multimeters, and different companies offer digital ones. People often select the type of company according to their choice or according to their budget sometimes.
Suppose you have bought a micronta multimeter and are searching for a helpful guide. In that case, you are in the right place because here in this article, you will find a useful guide on using a micronta multimeter along with the different components guide.
Micronta multimeter:
The micronta multimeter is the same as the other digital multimeters as it gives readings about different electrical terms, including resistance, continuity, voltage, and many others. Still, people sometimes need clarification while using the micronta multimeter because of different styles.
So before moving towards the guide of using the micronta multimeter. First, you should know about its essential parts and components.
Basic parts of a micronta multimeter:
Here is the list of the basic parts of a micronta multimeter. By checking this list, you will get able to understand the structure of the micronta multimeter precisely before using it
- Probes
- Display screen
- Ports
- Selection knob
These are the main components of a micronta multimeter.
How to identify and locate different parts of the micronta multimeter and their uses:
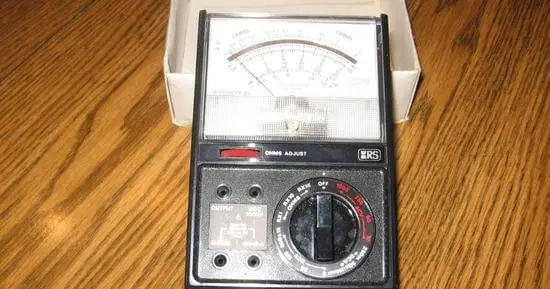
- The first component directly visible to you is the display screen of the micronta multimeter. The digital screen is present right above the dimensions on the micronta multimeter. You can see the final results and readings through this display screen.
- The second component without which the micronta multimeter cannot conduct any test is the selection knob which you will find in the middle of the micronta multimeter. You use this selection knob to select what readings you want to measure. You can rotate the selection knob according to your choice and leave it at the option from voltage, resistance, and continuity according to the type of test you want to perform.
- The third main component of the micronta multimeter is the probes. There are two probes in the micronta multimeter. The first is black, and the other one is red. Connecting these probes to the respective tool will only get results.
- The fourth component is the port to which the probes are connected. There are two ports in the micronta multimeter. The first is called COM port, and the second is presented by the sign” -.”
Types of micronta multimeter:
- Analog micronta multimeter
- Digital micronta multimeter
- Handheld micronta multimeter
- Benchtop micronta multimeter.
All these types can measure voltage resistance, capacitance, frequency, temperature, and many other electrical measurements. Only the way the results will be displayed or how you will handle the multimeter is different in these types. However, all of these micronta multimeters will give you reliable results.
Understand the symbols of the micronta multimeter:
The thing which most people do not understand is the symbols got displayed on the micronta multimeter, so it is necessary to have proper guidance regarding the symbols of the micronta multimeter
- V~: If you see this symbol on your micronta multimeter, it means that this is the symbol of alternating current voltage or AC voltage, so if you want to measure the AC voltage from the micronta multimeter, then you have to turn The selection knob to this symbol.
- V–: This is the symbol for the direct current voltage or the DC voltage, so to measure the DC voltage of any of the electric tools, you have to turn the dial of the micronta multimeter towards this symbol. The batteries’ direct current voltage is mostly measured using the micro multimeter on these settings.
- Diode icon: If you see a diode icon on the micronta digital multimeter, it means that this is the point for measuring the continuity. So, if you want to measure the continuity, you have to turn the selection knob towards the diode or wave-like icon.
- Ω: This is the symbol of the resistance, which is called an ohm, so if you want to Mayor the resistance in the electric current, you have to turn the dial of the micro multimeter towards this symbol.
- A–: This is the symbol for the direct current amperage, or you can call it the amperage, so if you want to measure the amount of amperage, then you have to turn the dial towards this symbol.
How to use a micronta multimeter?
After learning about the different types and symbols of the micronta multimeter, you are ready to know how to use a micronta multimeter. As you can measure different terms like current, voltage, and resistance, you will learn how to measure these different terms using the micronta multimeter.
Beginners guide:
There are some critical points that you should know before starting to use the micronta multimeter.
- There is an off and on button on the micronta multimeter from which you have to give an action to the micronta multimeter to get on or off.
- The Black and Red probes in the micronta multimeter have to go in the two of the ports, COM and mAVΩ
- The black probe will always get connected with the COM port.
- The red probe will always get connected with the mAVΩ port.
- If you measure the voltage or any readings lower than 200mA, the red probe will go into the 200mA
- If you measure the voltage or any readings higher than 200mA, the red probe will go in
Precaution:
Do not change the setup anyway because if you do that and if the higher current gets detected by the micronta multimeter while the red probe is present in the 200mA port, your micronta multimeter will get damaged, and then you will not be able to use it anymore.
How to measure the voltage of a battery with a micronta multimeter?
To measure the voltage using the micronta multimeter, follow the following guide.
- Set the multimeter at the DC voltage symbol if you are measuring the voltage of a battery.
- If your battery has a voltage of 1.5 V, you must select the range at the micronta multimeter of 2V.
- Connect the red and black probes to their corresponding ports, as mentioned above
- Now connect the red probe of the micronta multimeter with the “+” sign terminal of the battery and connect the black probe with the ground terminal.
- Now see the digital screen.
- You will get the voltage readings on the micronta multimeter’s screen.
- Note the readings
- This is the amount of the DC voltage of your battery.
- If the results are near or exactly 1.5 volts, then it means that your battery is running well.
How to measure the resistance with a micronta multimeter?
The following steps are given as guidance of the procedure you have to follow to measure the resistance by using the micronta multimeter.
- To measure the resistance using a micronta multimeter, you have to set the micronta multimeter to the resistance settings.
- Turn the selection knob of the micronta multimeter towards the ohm symbol
- Select the range for the resistance on the micronta multimeter
- Select any amount from 20k to 2M ohm at the section dial.
- Connect the red and black probes of the micronta multimeter at their specific terminals
- Now you take the resistor and connect the red and black probes.
- Now you will get the resistor’s resistance readings, which you can see from the digital screen of the micronta multimeter.
How to measure the continuity of cable with a micronta multimeter?
If you have a cable and are looking for its continuity, then you have to measure it by following these steps.
- Turn the power supply of the system OFF.
- Set the multimeter at the continuity symbol by turning the selection knob towards the diode or wave-like symbol on the micronta multimeter.
- Attach the red and black probes of the micronta multimeter with their respective terminals.
- Connect the red and black leads of the micronta multimeter with both ends of the cable
- You are doing this because you have to complete the circuit of the current.
- After connecting the leads with the sides of the cable and completing the circuit, you have to look at the digital screen of the micronta multimeter.
- Now, if you get “zero” as the answer, then it means that the circuit is complete and the continuity is present there, but if the micronta multimeter reveals “1” as a result, then it means that there is an issue in the circuit and it is not complete.
Final verdict:
In the simple micronta multimeter, you can measure an item’s voltage, resistance, and current. But if you have a special kind of micronta multimeter, then you can also measure many other terms like frequency, temperature, and capacitance by using it. If you look forward to testing any special electrical terms, you can change the micronta multimeter’s settings to their corresponding options and symbols.
It is very easy to use the micronta multimeter if you completely understand the symbols and their purposes. By measuring the resistance, voltage, or continuity of various items using the micronta multimeter, you will get valuable experience.
So follow the guidelines mentioned above correctly and find the solution to your problems at your home.
Frequently Asked Questions
Can I change the position of the red and black probes in the ports?
No, you attach the red and black probes just right, according to the above explanation. Any alteration in it will not give you the results and can also damage the multimeter.
What type of micronta multimeter is preferable: the bench top or the handheld?
The handheld micronta multimeter is preferable. Because it is portable and you can take this handy tool anywhere, the bench top micronta multimeter is only able to be taken away with you sometimes as it is a big-sized and heavy-weight tool.
Can I make the transistor test by using the micronta multimeter?
Yes, the micronta multimeter also contains the option of making a test for the transistors.
Related Guides:


