Craftsman multimeter is an advanced and accurate device to measure electrical quantities such as resistance, amperage, voltage, and continuity. In this article, we’ll learn how to properly use a craftsman digital multimeter.
Craftsman is an electrical tool manufacturing company that produces tools such as multimeters, electrical saws, inverters, vacuum cleaners, drills, and many more.
Let’s learn how to use a craftsman digital multimeter safely:
Table of Contents
ToggleWhat is a craftsman multimeter & How do you use it?
A craftsman multimeter is an electrical meter used to measure any circuit’s voltage, current, resistance, and continuity. It’s quite easy to use a craftsman digital multimeter, even if you are a beginner.
You must insert the probes in the right port on the multimeter and select a required range for measuring an electrical quantity. So now let’s find out how you should use it.
Parts of Craftman Multimeter
A craftsman multimeter has 3 major parts.
- A dial or knob is used to select different settings(modes) and ranges. For example, you’ll have to rotate the dial to the DC voltage symbol to select DC voltage.
- Three ports are at the bottom of the multimeter for probes.
The black probe always goes to the COM-labeled port, which is a ground terminal (negative).
The red probe is connected in the VmAΩ labeled port to measure voltage resistance and amperage in milliamps (less than 1 amp).
However, to measure current above 1 amp red probe is inserted in the 10A port.
- Multimeter Display: The display is a small multimeter screen showing the result or reading of a test.
Functions of a Craftman Multimeter
A craftsman digital multimeter offers 7-8 functions, such as resistance, voltage, amperage, and continuity.
DC Voltage
Rotate the dial to the VDC sign to measure DC voltage with your craftsman multimeter. You can select a range from 200 millivolts to 600 volts.
AC voltage
Adjust your multimeter dial (knob) to the VAC sign and select a range between 200 and 600 volts. AC voltage setting has a higher range because the AC supply(home) provides high voltage.
Amp DC
Set your craftsman multimeter dial to ADC sign to measure DC amps and select a range such as 200 mA to 10A. Remember that to measure amperage higher than 1 amp, and you must insert the red probe into the 10A port on the multimeter.
Amp AC
Set your multimeter’s dial to AAC sign to measure AC amperage and select a range.
Resistance
To measure resistance in a circuit, rotate your multimeter knob to Ω sign and select a range between 200 ohms to 2000k ohms.
Continuity
To check continuity(complete path) in wires and circuits, rotate your multimeter dial to the diode symbol.
Battery voltage
With the Bat setting, you can test the voltage of a battery, such as 1.5 or 9 volts.
However, in some other craftsman multimeter models, such as craftsman 82007, there is no option to select the range. You have to select the mode(setting), and the multimeter will automatically detect whatever the range is; this function is called auto-ranging.
Tips:
Never test a circuit without wearing gloves.
Don’t measure current or voltage above the multimeter’s range; otherwise, your multimeter will be damaged.
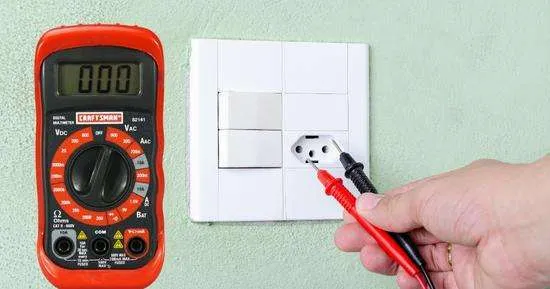
How to test voltage with a craftsman multimeter?
To test voltage, we’ll select the voltage setting and required range. After that, we’ll attach the multimeter probes to the circuit we are testing, and your multimeter will display the voltage of that circuit.
-
Set the multimeter
To measure voltage, set your multimeter to DC or AC volts. If you are testing a battery-based circuit, select DC voltage(VDC). If you are testing an AC circuit such as a home outlet, select AC voltage(VAC). Select a range above the circuit you are testing. For example, adjust your dial to 200V if you are testing a 120 V outlet.
Insert the black probe in the COM port.
The red probe goes to the vmAΩ port
-
Attach probes to the testing circuit
Let’s suppose you are testing an outlet or AC circuit; after adjusting the setting, connect the red multimeter probe to the live wire of the circuit and the black probe to the ground wire.
-
Evaluate Results
Check your multimeter readings on the screen and evaluate if the circuit is properly working or is damaged(if voltage drops than the ideal range)
How to use a craftsman digital multimeter 82082
Craftsman digital multimeter 82082 has a white front body and works like any other multimeter. To use a craftsman digital multimeter 82082, insert the black probe in the COM port and the red port in VmAΩ(for less than 1 amp) or 10mA port(above 1 amp) on your multimeter.
Now turn your multimeter on from the power (on/off) button. Select a setting(mode or electrical quantity), such as voltage, resistance, or amperage, as per your requirement. Now attach the red multimeter probe to the live wire of the circuit(under test). Connect the black probe to the ground port. You’ll get the reading on the multimeter display.
In the same way, you can also use other multimeters, such as a craftsman digital multimeter 82141.
Conclusion
So that was it. Using a craftsman multimeter for measuring the electric current is not a big deal. However, if you are a total novice, we suggest you get the know-how of electrical values and their units about which values ease what so that you can understand things better. Also, follow the steps accurately to get the value right.
Related Guides:


