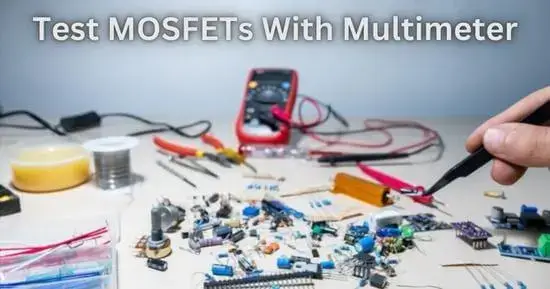
MOSFETs (Metal-Oxide-Semiconductor Field-Effect Transistors) are commonly used in electronics to control current flow. Testing MOSFETs is crucial for ensuring the proper functioning of electronic devices. This guide will provide a comprehensive overview of how to test MOSFET using a digital multimeter.
You can test MOSFETs accurately and efficiently with our step-by-step instructions and troubleshooting tips.
Transistors are essential for electrical suppliers like switches, power supplies, motor controls, amplifiers, and inverters. The transistors are present in almost all home appliances, but ordinary transistors are simple enough to study and test; it is different when discussing MOSFET.
What is MOSFET?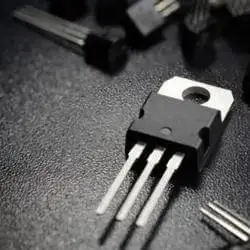
Mosfets are a unique and modern type of transistors installed in home appliances and stylishly do the work of transistors. As the name suggests, MOSFETs are metal oxide semiconductor field effect transistors, so these individual transistors have two major components. The first is a metal oxide, and the second is a semiconductor.
So these MOSFETs, the modern transistors, help to amplify different types of Loads in home appliances.
Working of MOSFET
As MOSFETs are transistors, they work on generating electric fields. The MOSFETs are made up of semiconductors.
When the electricity is supplied to the MOSFETs, the charge carriers or electrons in the semiconductor start moving and produce the electric field. The terminal, called the gate terminal, helps and pushes in the charges in the semiconductor. That’s why the resistance between the drain terminal and the source decreases, and the current starts passing between them easily.
When we turn off the MOSFETs, the generated electric field attracts the electrons and the charge carriers. Because of this, the resistance between the source and the drain terminal increases and stops the current flow between them.
So mosfets help transmit electric current between the source and the drain terminal.
The working of the MOSFETs is quite like the normal transistors, but the materials used to make the MOSFETs and the functioning of the MOSFETs are different from the normal transistors. That is why it seems complicated to test the MOSFETs, and in that condition, we need proper guidance so that if we see any fault in the MOSFETs, we can check it properly without showing any negligence.
Types of MOSFET: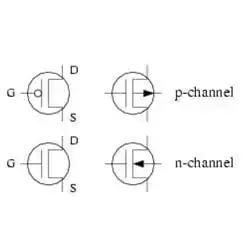
There are two types of MOSFETs.
-
P channel MOSFET:
The second type of MOSFETs is the p-channel mosfets, and they are called p-channel MOSFETs because the type of doping in the semiconductor is p-type in them.
The p-type channel MOSFETs have many holes in the semiconductor, so the p-type doping helps to increase the number of holes in their semiconductor.
-
N channel MOSFET:
The first type of MOSFET is the n-channel MOSFET. This is called the n-channel MOSFET because the doping in the semiconductor material is of n-type in them.
Because of this, N-type doping increases the number of electrons in the semiconductor. In an N-channel MOSFET, there are a large number of electrons present in the semiconductor.
How to test a MOSFET using a digital multimeter?
To check the type of fault and damage in the MOSFET, you can use a well-defined and the most famous electronic tool, the digital multimeter, for this task. This tool is getting used to test the MOSFET because it is easy to handle, and anyone can test the MOSFET if he knows how to use the digital multimeter correctly.
If you are in fear and are testing the MOSFET for the first time, then using a digital multimeter will be convenient for you.
Precautionary measurements:
Before handling and testing any electronic tool, you should be aware of some preventive measures. It is beneficial because if you try to test the electric tools and appliances without any precautionary measures, you can even meet with a sudden accident to save yourself from any future disaster and take into account the following preventive measurements.
- Do not touch the MOSFET if you can see any physical damage to it because, in the damaged condition, it is not beneficial to test it with a digital multimeter. In that condition, you must replace it with a new one, so don’t try to test any damaged or broken MOSFET.
- When you are going to test the MOSFET then, make sure that you are wearing protective gloves and glasses
- Make sure you know about the MOSFET’s maximum current and voltage value before starting its testing with the digital multimeter.
- Use a clean digital multimeter to test the MOSFET, especially the parts of the digital multimeter that will connect with the digital multimeter.
Tools and material required:
- Digital Multimeter
- Protection gloves
- Protective glasses.
After arranging all the tools and materials required for the testing procedure of the MOSFET and taking into account some major precautionary measures, now you are all ready to test the MOSFET by using the digital multimeter, for which you have to follow the given steps.
Before moving forward to a detailed guide, here is a quick overview of the testing procedure.
How to test a MOSFET using a digital multimeter (quick step guide):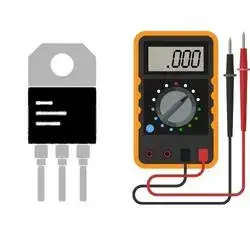
- You should know about the gate terminal, drain terminal, and the source terminal of the MOSFET
- Set the digital multimeter at the diode settings
- Keep the MOSFET turned off
- Connect the positive lead of the digital multimeter with the gate terminal of the MOSFET and the negative lead of the digital multimeter with the source terminal of the MOSFET
- See the display screen of the digital multimeter
- if the multimeter shows zero voltage, then it means that the MOSFET is good, and if it shows any other voltage reading, then it means that MOSFET has got damaged
- Now attach the positive lead of the digital multimeter with the gate terminal of the MOSFET and the negative lead of the digital multimeter with the voltage terminal of the MOSFET
- If the display screen of the digital multimeter shows zero voltage, then it means that the MOSFET is working well
- Now set the digital multimeter at the resistance settings
- Connect the positive probe of the digital multimeter with the drain terminal of the MOSFET and the negative lead of the digital multimeter with the source terminal of the MOSFET
- If the digital multimeter shows a high resistance value, then it indicates that the MOSFET has no issues with it
- Now connect the positive probe of the digital multimeter with the drain terminal and the negative probe of the digital multimeter with the source terminal of the MOSFET
- If the digital multimeter shows a low resistance value, then it means that the MOSFET is good
- Now set the digital multimeter at the continuity settings
- Connect the red probe of the digital multimeter with the gate terminal of the MOSFET and the black probe of the digital multimeter with the source terminal of the MOSFET
- Look at the display screen of the digital multimeter
- if it indicates the presence of the short circuit and high continuity value, then it means that the MOSFET has not been damaged, and if you do not see any continuity, then it means that the MOSFET has been faulty.
Below is a step-by-step detailed guide to testing a mosfet with a multimeter:
How to test MOSFET using a digital multimeter (step-by-step guide):
Important Note:
The testing procedure is for the MOSFET with no voltage supply, so keep the MOSFET turned off and then apply the tests to it.
Step 1: Look for the terminals
Before starting to test the MOSFET, the first step is to know about all the terminals of the MOSFET. There are a total of three pins in the MOSFET. These are the gate terminal, source terminal, and drain terminal. All of these terminals are labeled with different letters.
So the gate terminal is marked with the “G,” the source terminal is labeled with the “S,” and the drain terminal is labeled with “D.” If you do not understand it, then you can also check the cover report given by the manufacturer that comes with the MOSFET. You can better understand by reading that.
Step 2: Set the digital multimeter
After getting notified about all the terminals of the MOSFET, you can now move toward the next step, which is the setting of the digital multimeter. First, you have to set the digital multimeter in the diode settings. You can do this by turning the selection dial of the digital multimeter towards the diode symbol. After setting the digital multimeter, now step forward towards the next step.
Step 3: Connect the digital multimeter
Now you have to connect the digital multimeter with the terminals of the MOSFET one by one. First, you have to take the positive lead of the digital multimeter and connect it with the gate terminal of the MOSFET and then take the negative lead of the digital multimeter and connect it with the source terminal of the MOSFET.
Step 4: Measure the readings
After connecting both the leads of the digital multimeter with the terminals of the MOSFET, you now have to look at the display screen of the digital multimeter. It will show the voltage value between the gate and the source terminal of the MOSFET.
If the MOSFET is working normally, the resulting voltage value should be zero, and if you are getting a higher voltage value, it means that the MOSFET got damaged.
Step 5: Change the connection
As of now, this is the time to perform the second test. For this, you have to connect the digital multimeter positive lead with the MOSFET’s gate terminal and the digital multimeter negative lead with the MOSFET’s drain terminal.
See the results
Your multimeter should show the zero voltage value between the MOSFETs’ gates and drain terminal. If it shows a higher voltage value, it indicates that the MOSFET has been damaged, and you have to replace it with the new one.
Step 6: Set the digital multimeter
Now you have to change the digital multimeter settings and turn the selection knob towards the resistance settings for the next step.
Step 7: Connect the multimeter
Now you have to connect the digital multimeter positive lead with the MOSFET’s drain terminal and the digital multimeter negative lead with the MOSFET’s source terminal.
See the results:
If the display screen of the digital multimeter shows you the lower resistance value, it indicates that the MOSFET is in good condition.
Important Note:
Now turn ON the MOSFET and test it in this condition by following the information.
Step 8: Test the resistance
To test the resistance of the MOSFET when it turns ON, you have to connect the positive lead of the digital multimeter with the drain terminal of the MOSFET and the negative lead of the digital multimeter with the source terminal of the MOSFET.
You should see a lower resistance value on the display screen of the digital multimeter. It will indicate that the MOSFET is working well, and if you see the results corresponding to the normal condition, then it means that the MOSFET has got damaged.
Step 9: Test the continuity
To test the continuity of the MOSFET when it is turned ON, you have to set the digital multimeter at the continuity settings and then connect the black probe of the digital multimeter with the source terminal of the MOSFET and the red probe of the digital multimeter with the gate terminal of the MOSFET. The fine MOSFET will show higher continuity values in the results.
Final verdict:
By checking the voltage, resistance, and continuity of the different terminals of the MOSFET with the help of a digital multimeter, you will decide whether your MOSFET is good or has turned faulty.
So after performing all the tests, you can better understand what you should have to do. Whether you have to have your MOSFET checked by any other professional or in the case of severe damage, the only solution will be the replacement of the MOSFET.
More Guides :


